The post Peanut Butter & Chocolate Chunk Cookies appeared first on Laying God's Table.
]]>These are super easy to bake, no chilling and only 6 ingredients required. These are a one bowl cookie dough which basically means two things, easy to make with no fuss and cleaning up is a breeze!
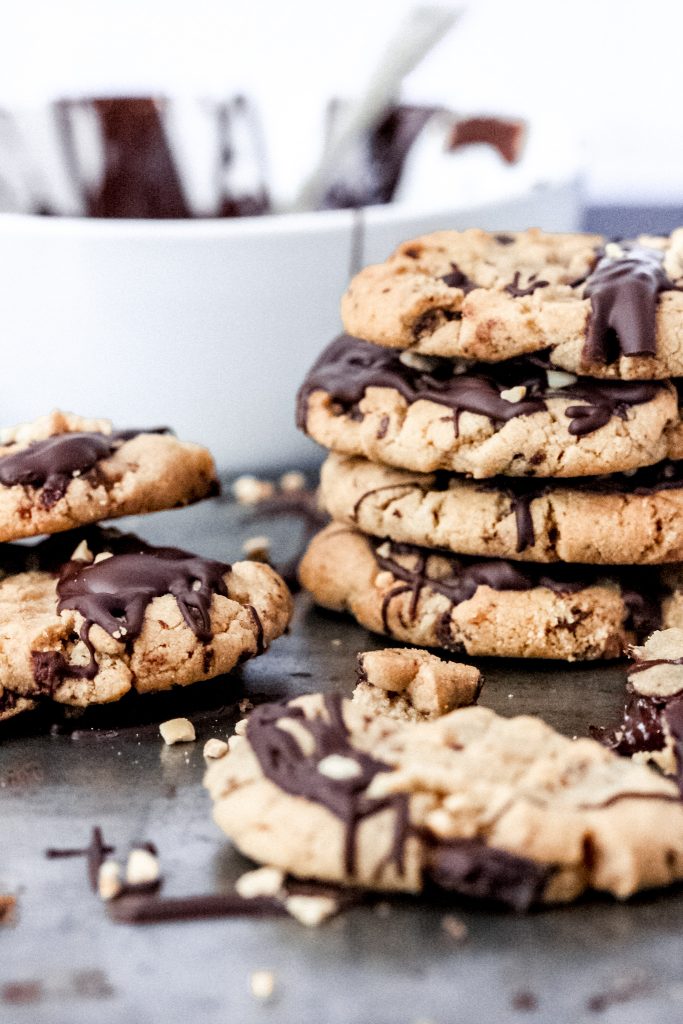
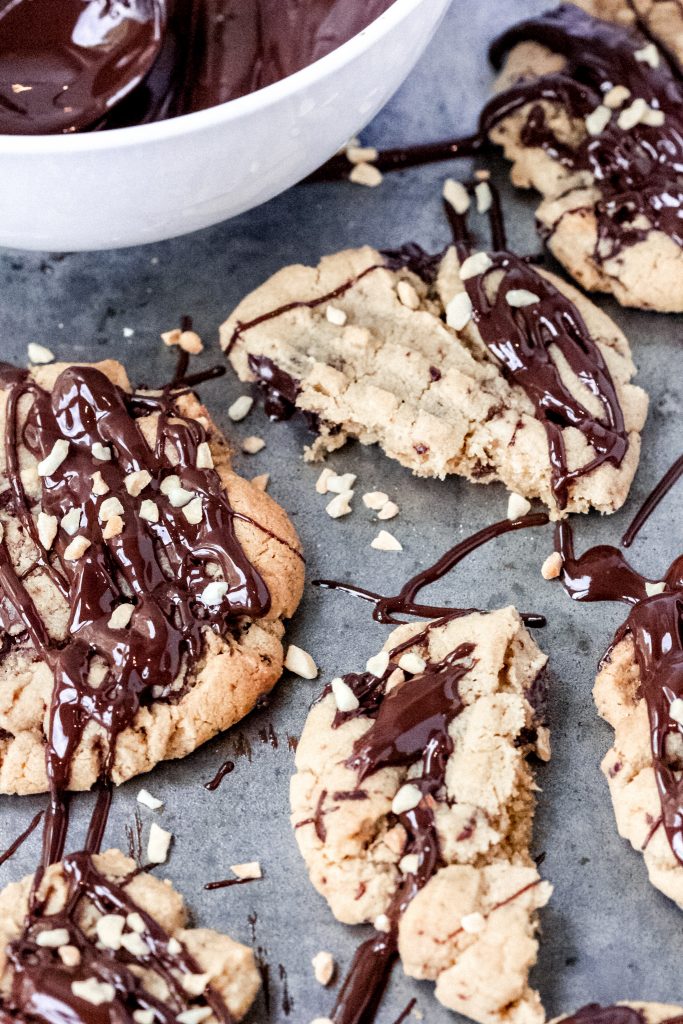
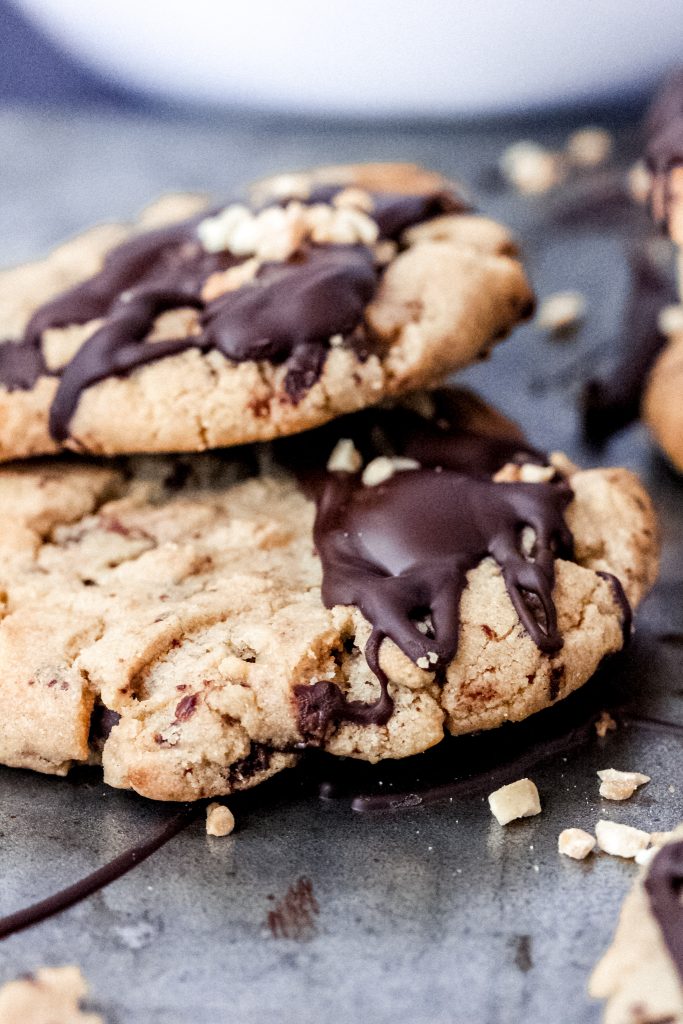
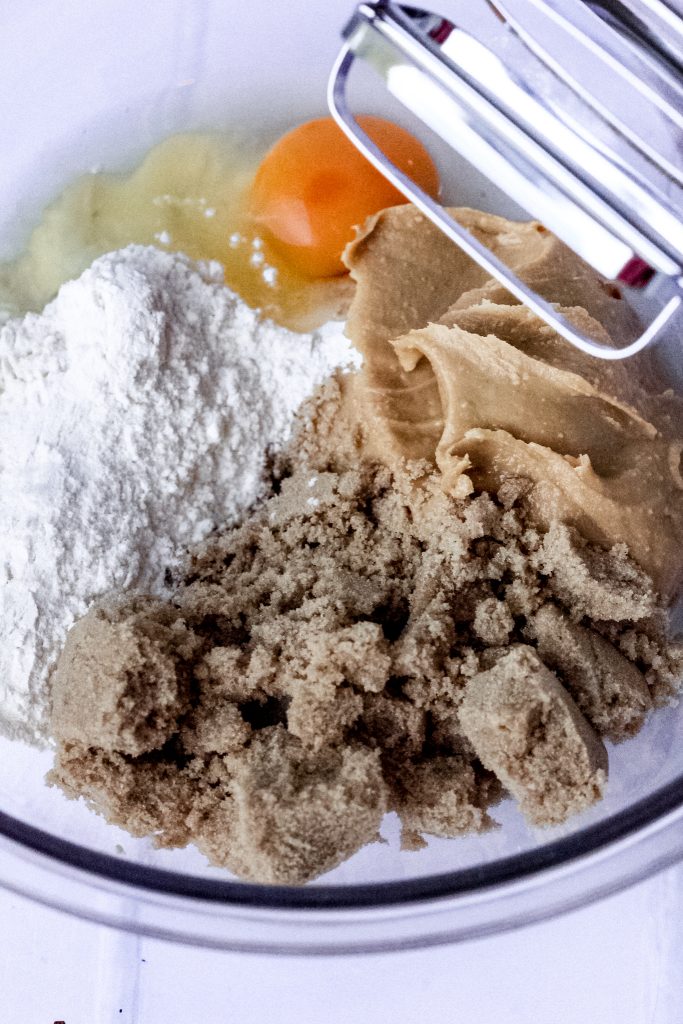
The cookie dough itself is very simple, it’s just peanut butter, egg, flour, brown sugar, baking soda and dark chocolate. And it has 2 extra ingredients which are optional; melted chocolate for drizzling and chopped peanuts for a sprinkle.
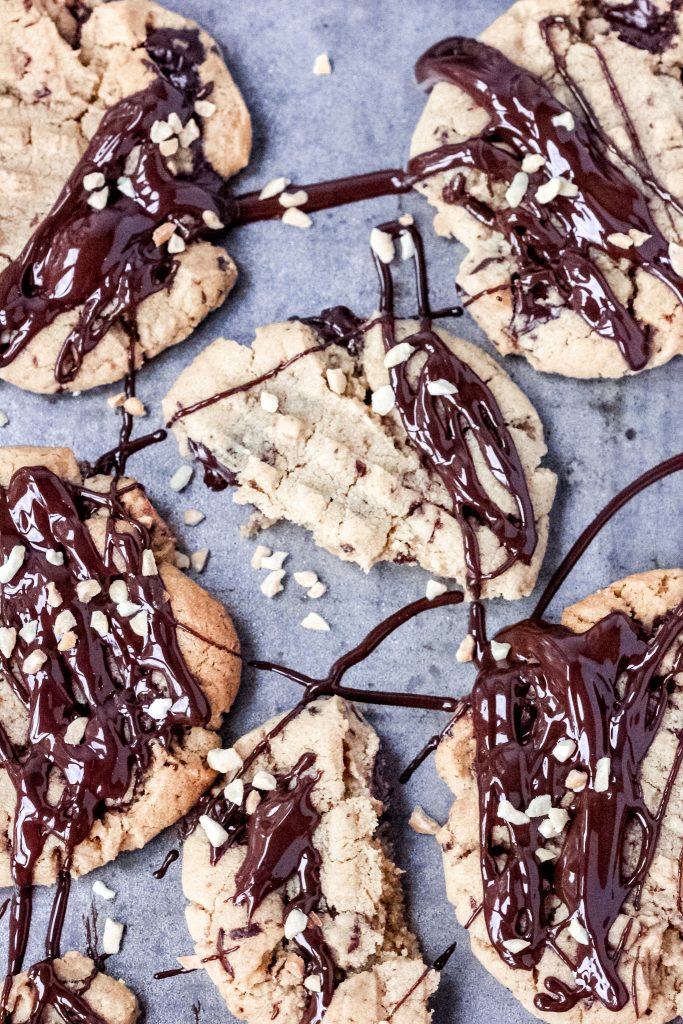
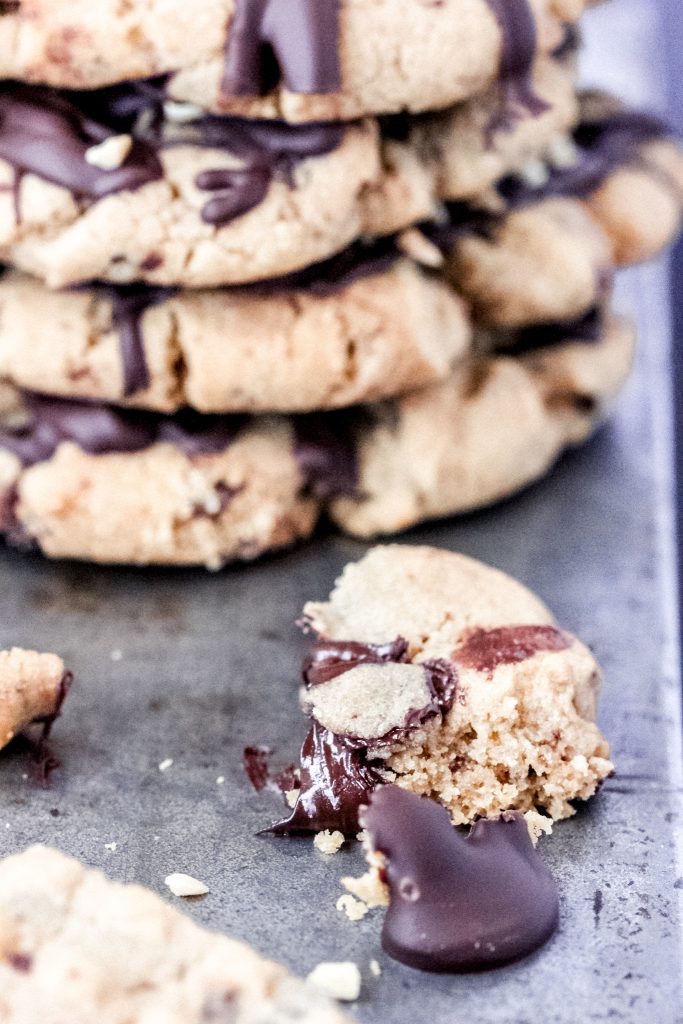
Peanut Butter & Chocolate Chunk Cookies are soft and gooey but have the perfect amount of crunch, just perfect for MUNCHING ON!!
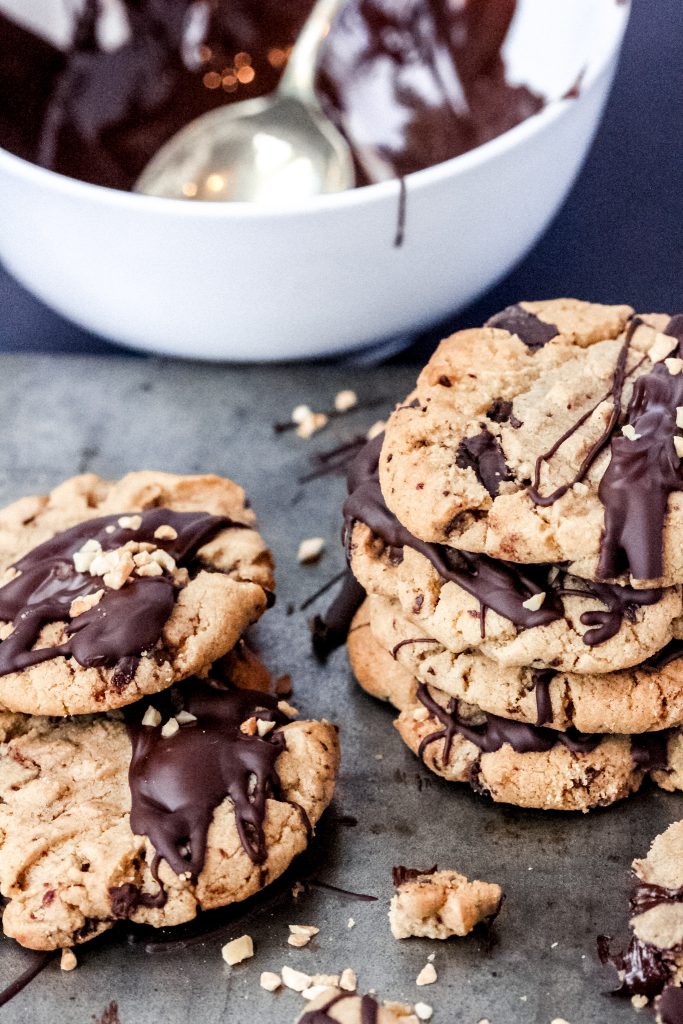
Every bite is DELICIOUS, peanutty, chocolatey, buttery and gooey! And all that yumminess is rolled into one delicimo cookie! And to top things off drizzle them in a rich dark chocolate! Just because more chocolate never hurt anyone….right!
So how did I make and bake these? Let’s start with a few details on what makes a perfect cookie! Or in this case what makes a perfect peanut butter & chocolate chunk cookie. Then we can get into the finer details of how to bake and eat these!!
WHAT MAKES THIS A PERFECT COOKIE
THE CHOCOLATE
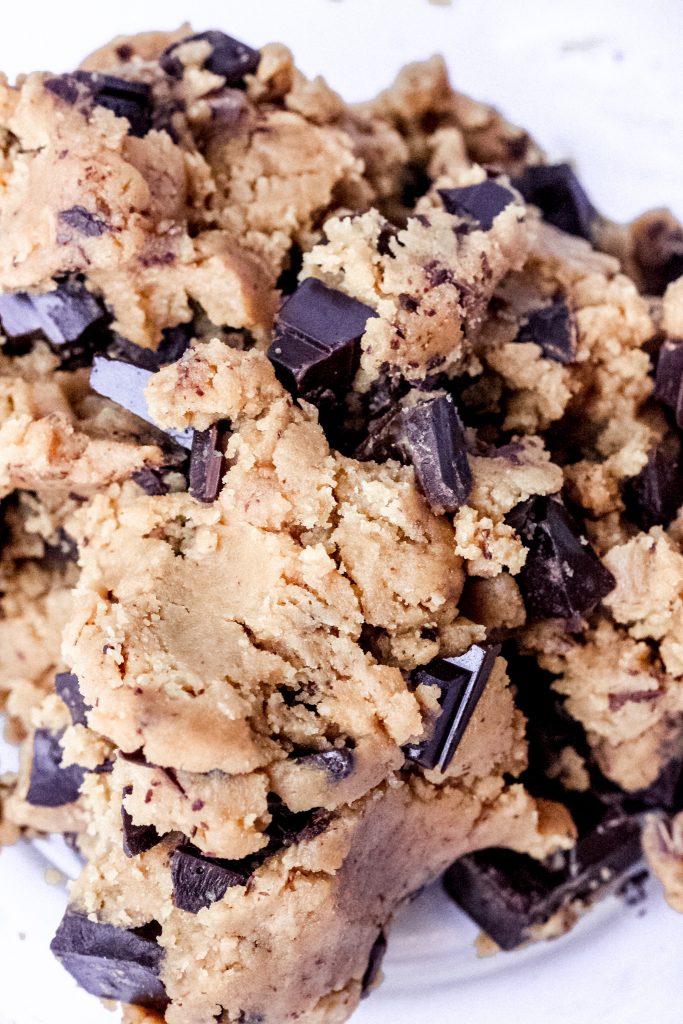
For this recipe I used Whittaker’s 62% dark chocolate and roughly chopped the chocolate up into some fine chunks and some chunkier chunks for texture. The reason I do this is because when you open up the cookie after it’s baked the dark chocolate is gooey and melty……just irresistible!
SCOOPING
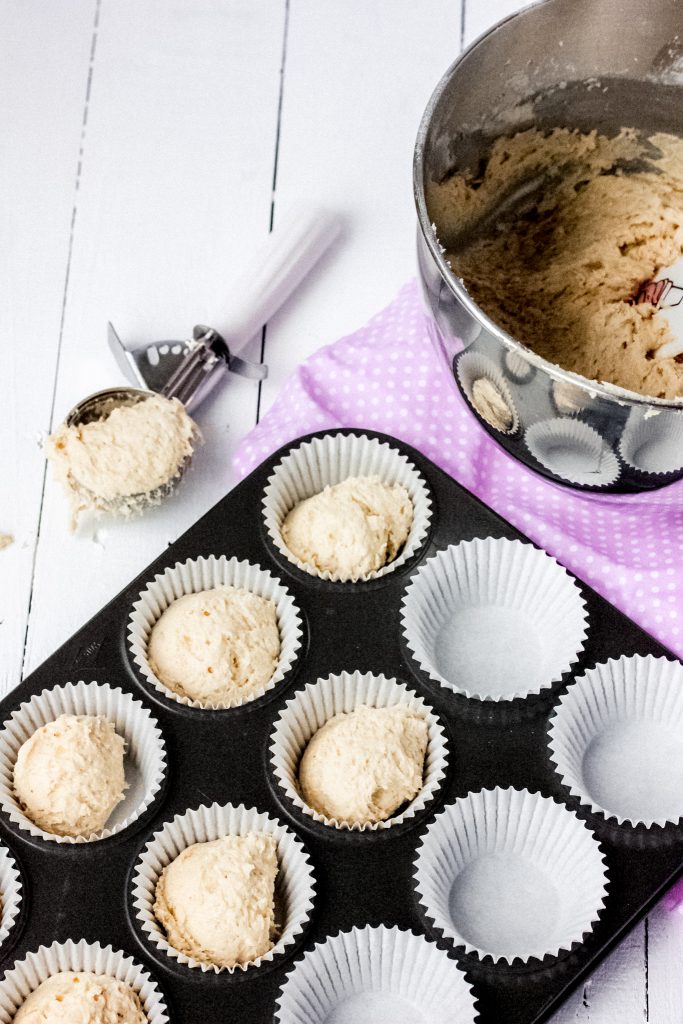
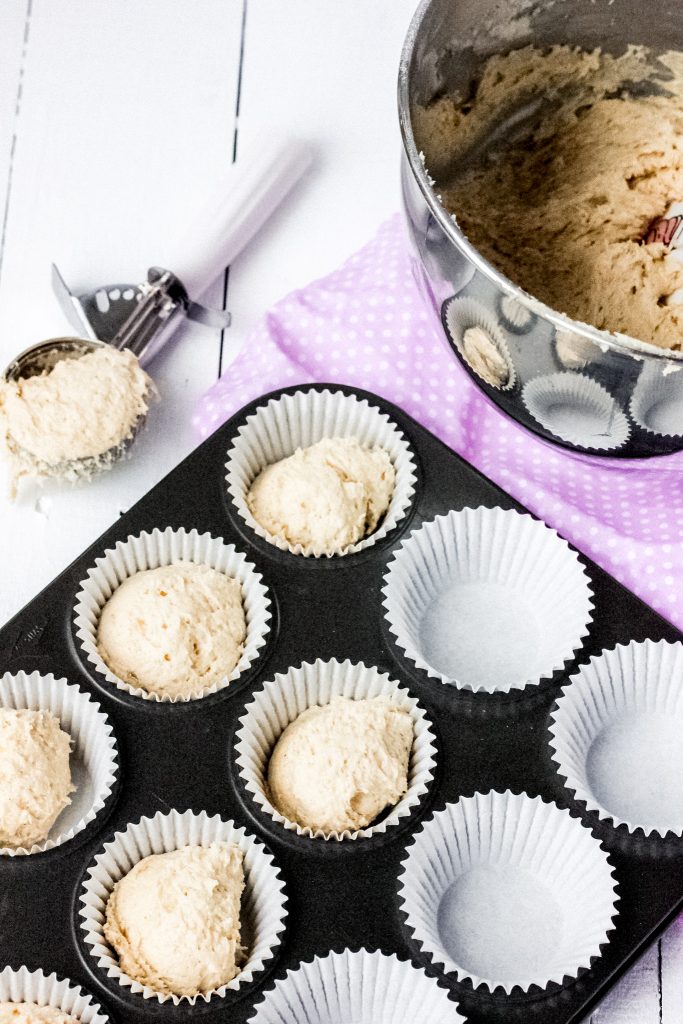
I use a medium sized ice cream scoop to measure my cookies. However, to get my cookies consistent in shape, I go the extra mile and weigh my cookie dough at 40 grams per cookie. It sounds like a lot of work but once you get into a roll (excuse my punt) you won’t regret it, your cookies will be almost perfect in shape and size.
BAKING
I prefer to under bake my cookies and then leave them for 15-20 minutes on the baking tray that way you get a gooey, chewy cookie as opposed to a hard overcooked cookie.
PEANUT BUTTER
Although there are so many delicious and worthy peanut butter brands on the market today, for this particular recipe I used Sanitarium’s Smooth Peanut Butter. This is for a very good reason, because the oil content seems to be less than other brands, which will help contain your cookies from spreading too much in the baking process.
FREEZING
You can freeze the uncooked dough for up to 3 months, make sure you roll them into balls and place in an airtight container in the freezer. When ready to use simply defrost to room temperature and bake them as per my baking instructions.
WHY I LOVE PEANUT BUTTER & CHOCOLATE CHUNK COOKIES!
As I’ve mentioned earlier the texture of these cookies is sublime! Perfect amount of nutty, buttery and chocolatey flavor…. these cookies are fit for a queen, and here’s why I’m MADLY IN LOVE with these cookies!!
- One Bowl – All ingredients go into one bowl. This means there is minimal mess and much easier to clean up.
- No Chilling Required – Making this recipe is an easy process. No need to wait hours before you can cook these cookies. This means more time for the important things like….FEASTING!
- No Fancy Equipment required – I used my good old faithful glass bowl, handheld beater and a wooden spoon, making the whole process just chilled and easy as pie!
- Only 6 ingredients – Making these babies is very simple, its all our favourite ingredients, peanut butter, egg, flour, brown sugar, baking soda and dark chocolate. Making these cookies is not only delightful but cost effective too.
- Storage – You can store them in an airtight container for up to 10 days. That’s if they make it that far!!
- Ice Cream Sandwiches – These are a perfect cookie to match up with your favourite ice cream! Simply scoop out a spoonful of your fav ice cream and sandwich together……..YUMMO!!!!!
HOW TO MAKE PEANUT BUTTER & CHOCOLATE COOKIES
The ingredients for the cookie dough are quite simple – they are, peanut butter, egg, flour, brown sugar, baking soda and dark chocolate. I added 2 extra ingredients which are optional; melted chocolate for drizzling and chopped peanuts for a sprinkle.
Of course, you can leave the melted drizzle chocolate off, but let’s be honest the more chocolate the better!
1. PREHEATING OVEN
Start by preheating your oven to 160°C fan bake and line two baking trays with baking paper. Then set them aside.
2. MIXING
Then take a big bowl and add the peanut butter, egg, brown sugar, flour, and the baking soda and gently use your handheld beater to beat all ingredients together to form a cookie dough.
3. ADDING
Then add the roughly chopped chocolate into the cookie dough and mix together until all ingredients are incorporated.
Tip: I used my washed and damp hands to mix the chocolate into the dough, oh it was fun and a little bit of the cookie dough accidently slipped into my mouth!!


4. ROLLING
Now you need to roll your dough into balls. Slightly dampen your hands (this will help the cookie dough from sticking to your hands). Then roll your cookie dough into balls. Weigh them as you go on a scale at 40 grams each in weight. I do this little trick so that when the cookies come out of the oven they are consistent in size, shape and weight. (That’s the perfectionist coming out of me!).
5. BAKING
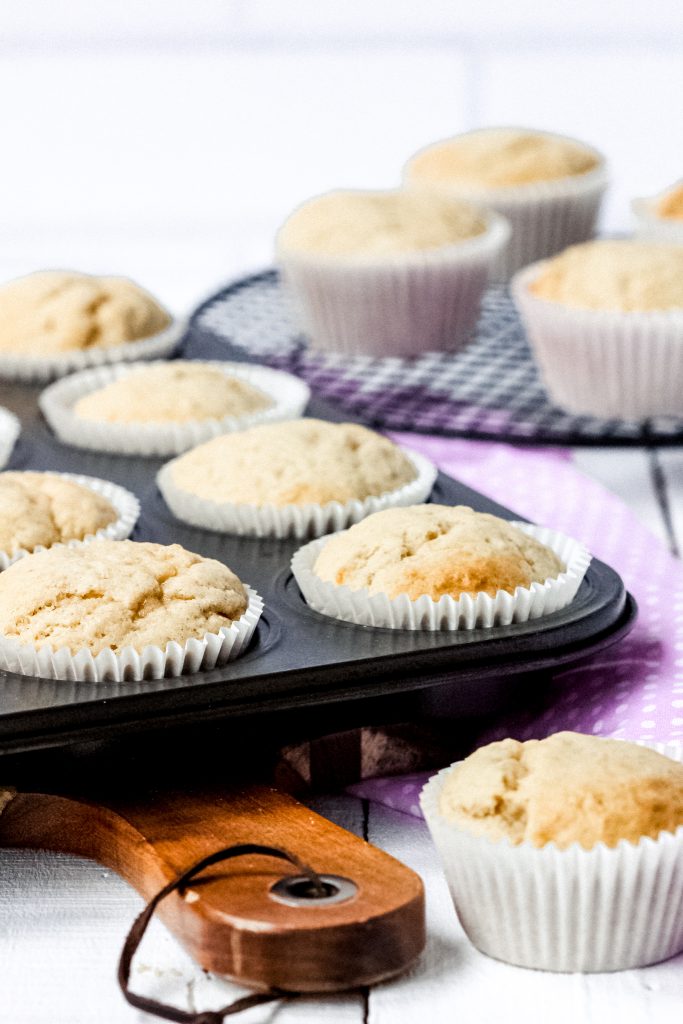
Put your cookie dough balls onto your prepared trays and gently press down on each cookie with a fork. Bake for 10-12 minutes until ever so slightly browned. Then remove from the oven to cool on a wire rack.
6. NEXT STEPS
Once the cookies are cooled, you can prepare your melted chocolate.
7. MELTING CHOCOLATE
Melt the chocolate in the microwave for 30 second intervals or until the chocolate has melted. Mine took just over one minute to melt.
8. DRIZZLING
Then take the melted chocolate and use a spoon to drizzle the chocolate over your cookies. Sprinkle over chopped peanuts for decoration and extra texture if you want.
Well folks all done! Go get your one bowl, add the peanut butter, egg, flour, brown sugar, baking soda and dark chocolate mix until all ingredients are combined…..BAKE and EAAAATTTTTT!!
Now can we all please agree that these are seriously one incredibly moorish, heavenly cookie recipe!!
My book Laying Gods Table has many more delicious cookie recipes for you to enjoy! Please click on link to get yourself a copy.
For ideas and tips on how to practice hospitality please read my blog post 5 tips for practicing Christian Hospitality. It will give you ways on how you too can demonstrate God’s love in action.
As always I would love to hear from you! If you’ve tried this recipe and like it please leave me a comment below.
Loves, Richelle xxx
The post Peanut Butter & Chocolate Chunk Cookies appeared first on Laying God's Table.
]]>The post Chocolate Dipped Waffle Cones appeared first on Laying God's Table.
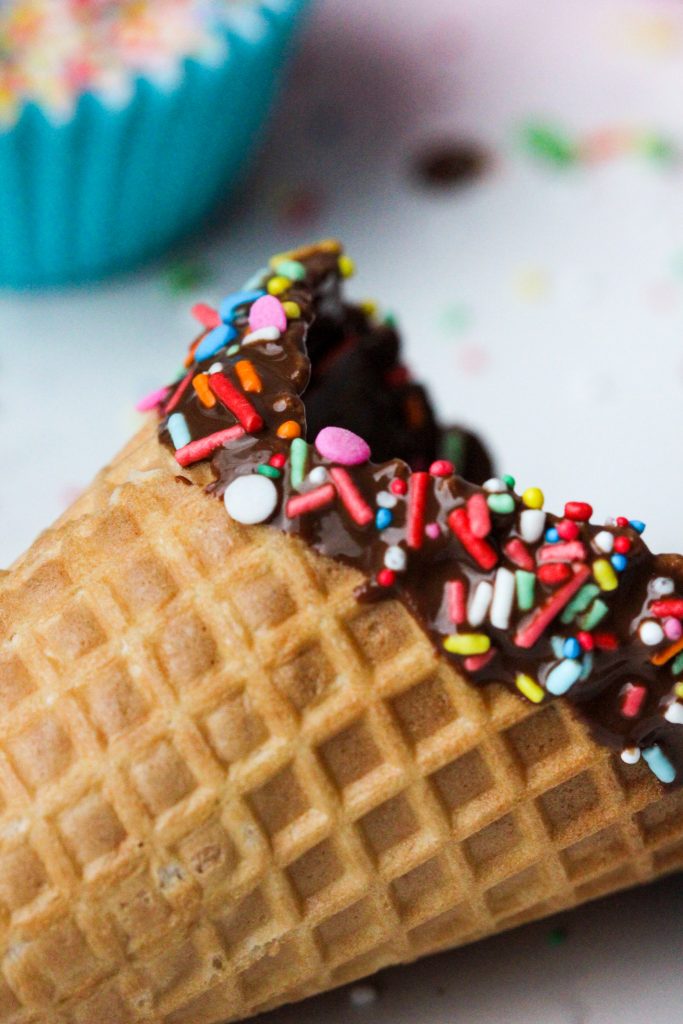
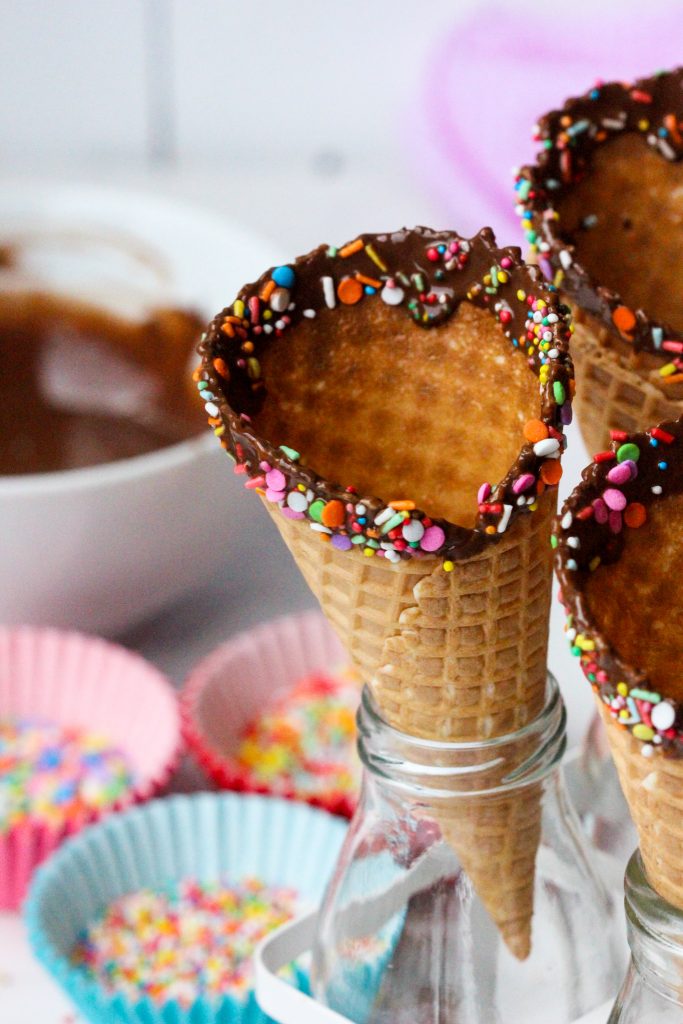
]]>If you’re having friends over for a small casual get together, BBQ or backyard party and want a summer dessert that you can pull together quickly, but still want everyone to be wowed, then let me share a very easily done, effortless, chocolate dipped waffle cone recipe!
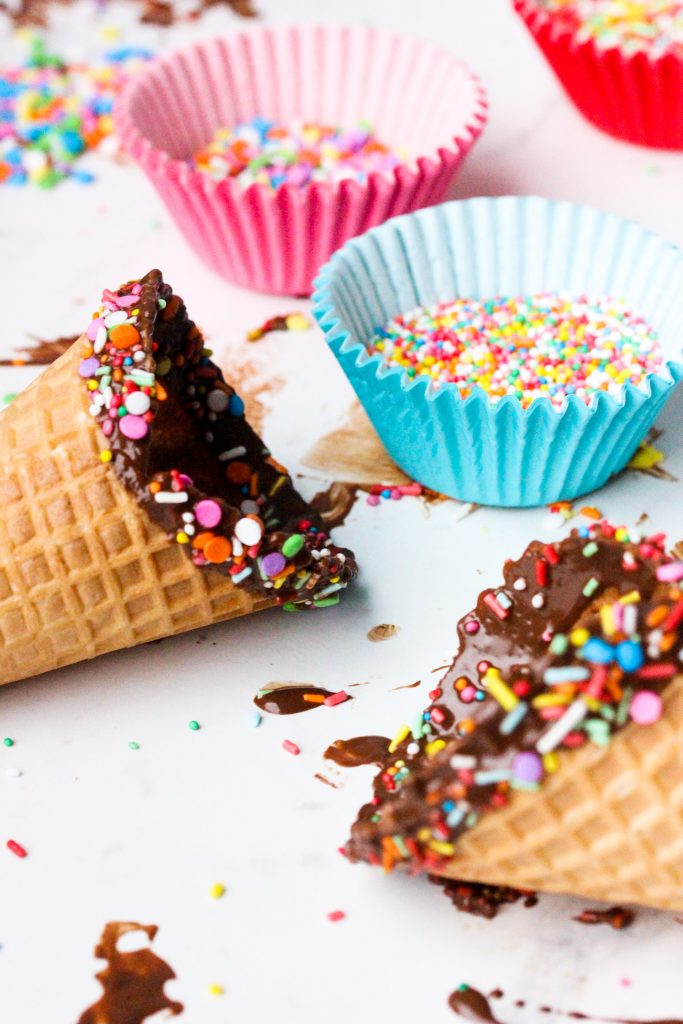
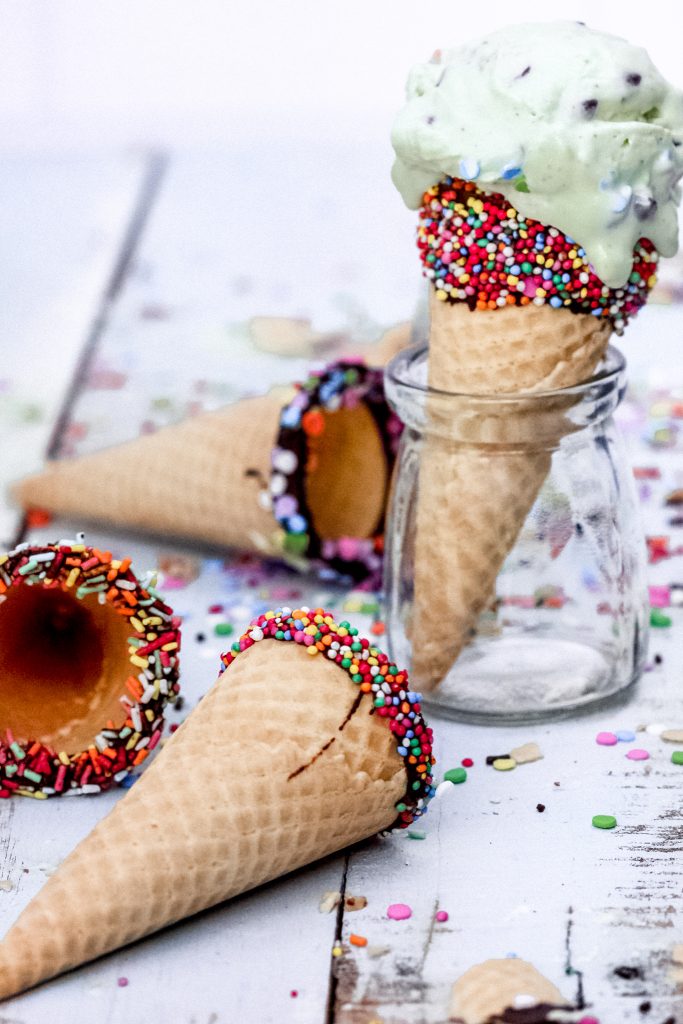
These are not only a piece of cake to make, but quick to prepare! You only need 4 main ingredients, waffle cones (or cones of your choice), chocolate, coconut oil and lastly sprinkles and more sprinkles (or your choice of other decorations, see more examples below).
These are practical and awesome! Whoever came up with this invention is a genius!

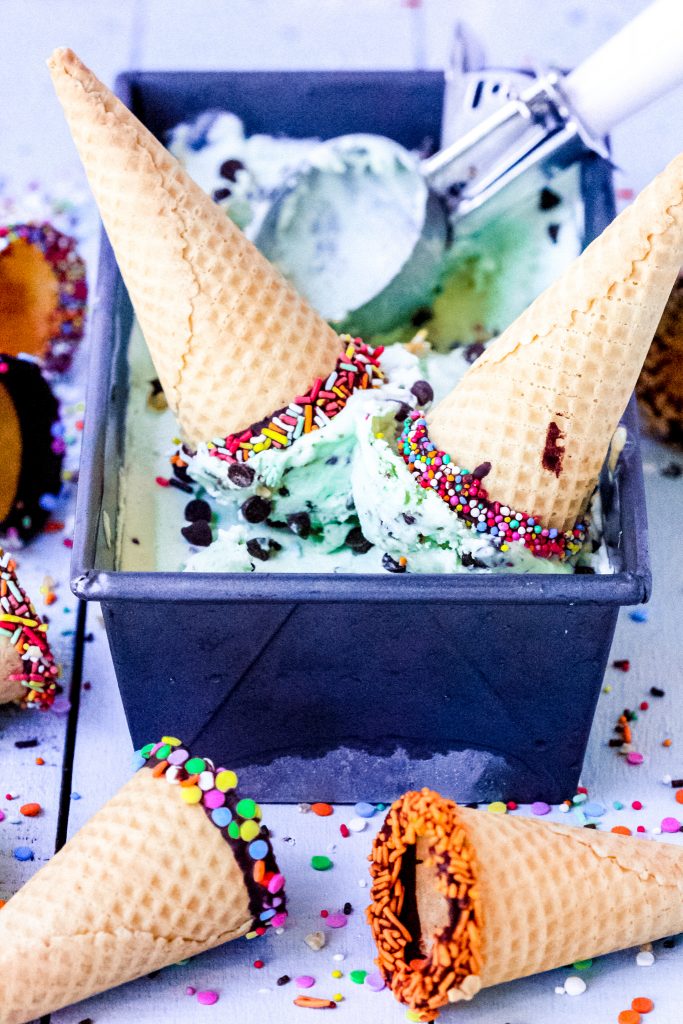
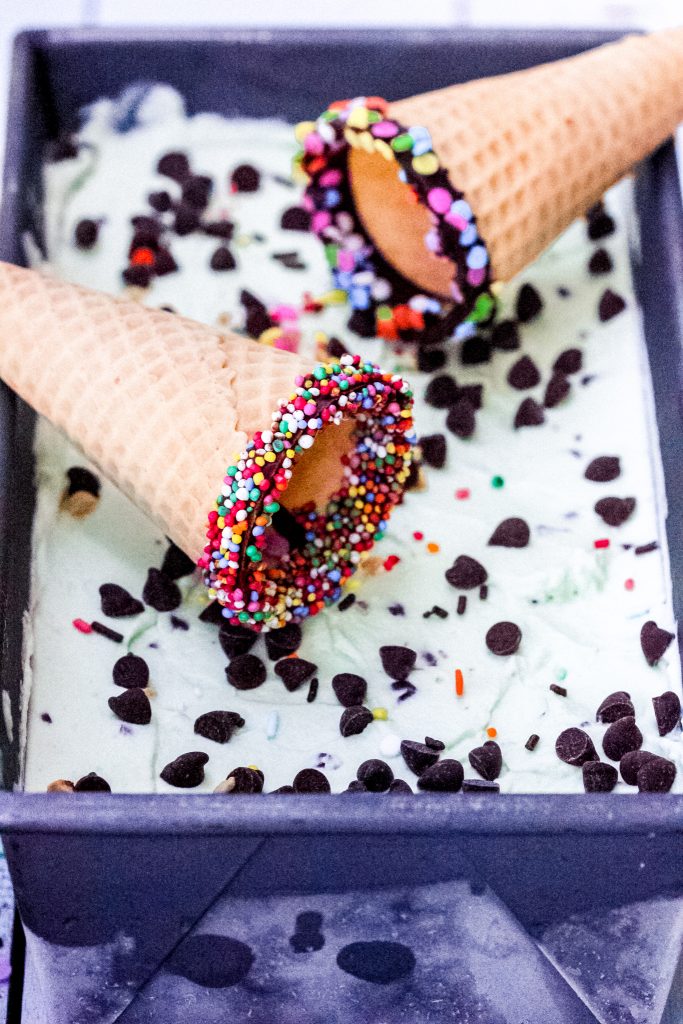
So, let’s up the ante! I decided to match my chocolate dipped waffle cones with my no-churn homemade mint chocolate chip ice cream. Can you imagine the delight! However if your time poor and making your own ice cream is just not on the agenda, then no worries just purchase your fav ice cream flavour and scoop it into your chocolate dipped waffle cones! Easy as that!
So, I’m sure by now you know that these are really easy to make! But how easy is easy?? Let me fill you in!
Well, you simply melt the chocolate and coconut oil in the microwave and then dip the waffle cone into the chocolate, sprinkle with your favourite decoration and that’s it!
The beauty about these creations is that you can leave the cone as is; dipped in chocolate for a sophisticated look, or you can dip the cone in other fun combinations, or your own ideas……the world’s your oyster!
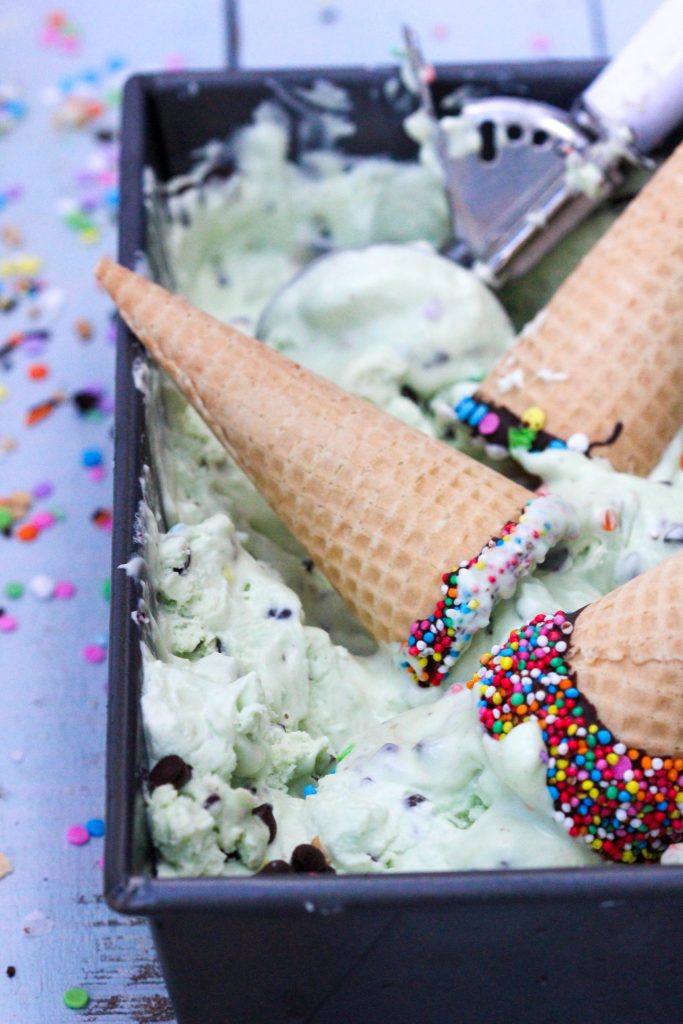
Once you have finished dipping the waffle cones and let them chill for at least 5-10 minutes, scoop your fav ice cream on top and serve your guests the decorated gizmo’s! Divine!!

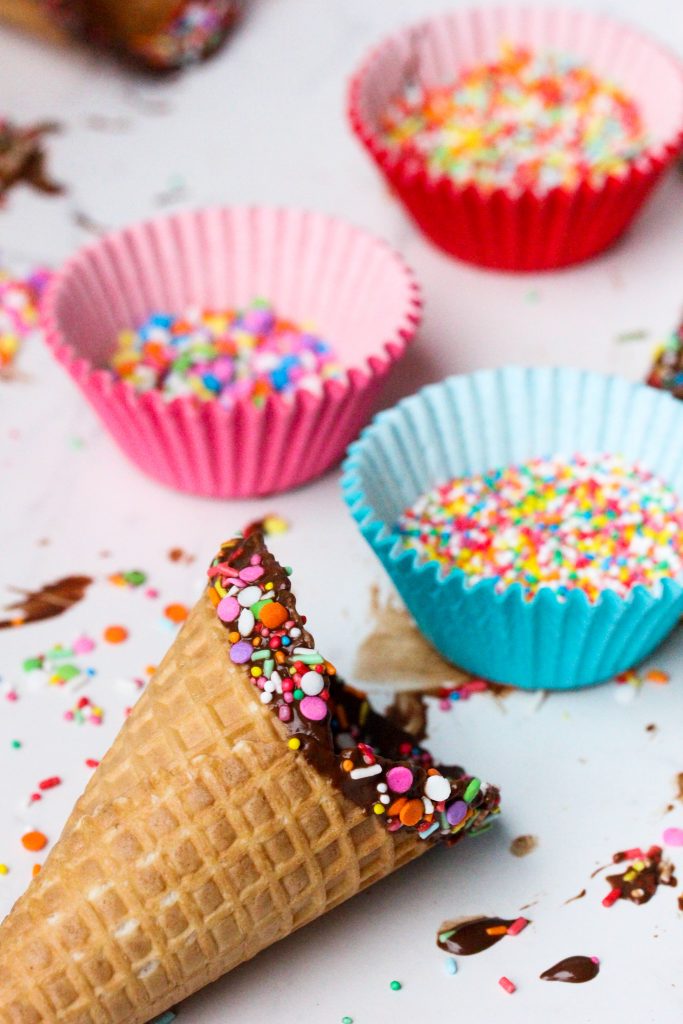
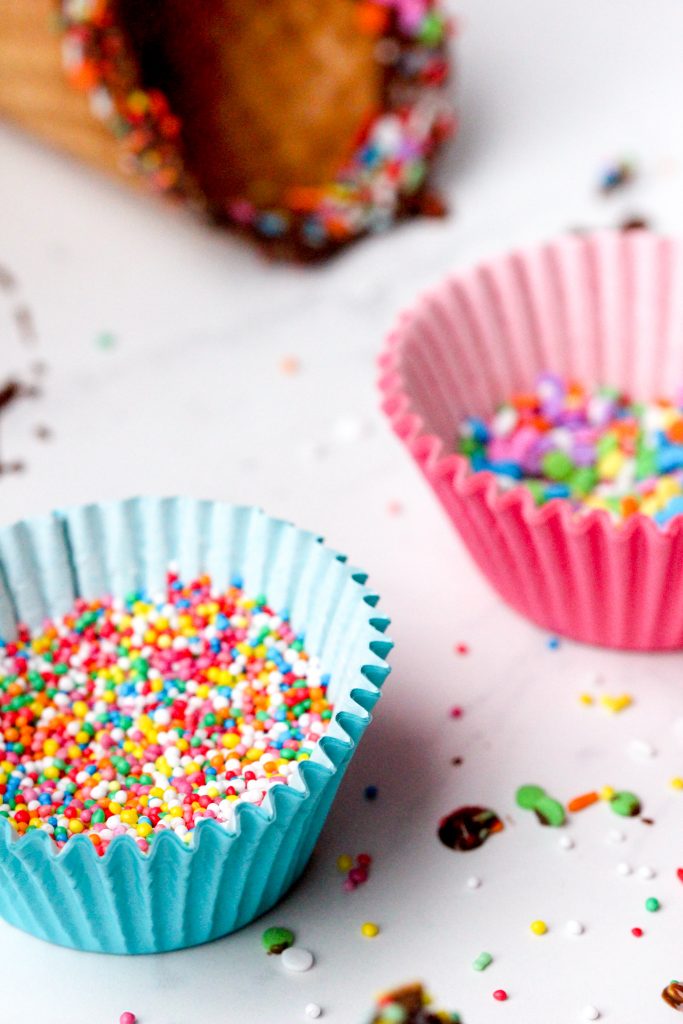
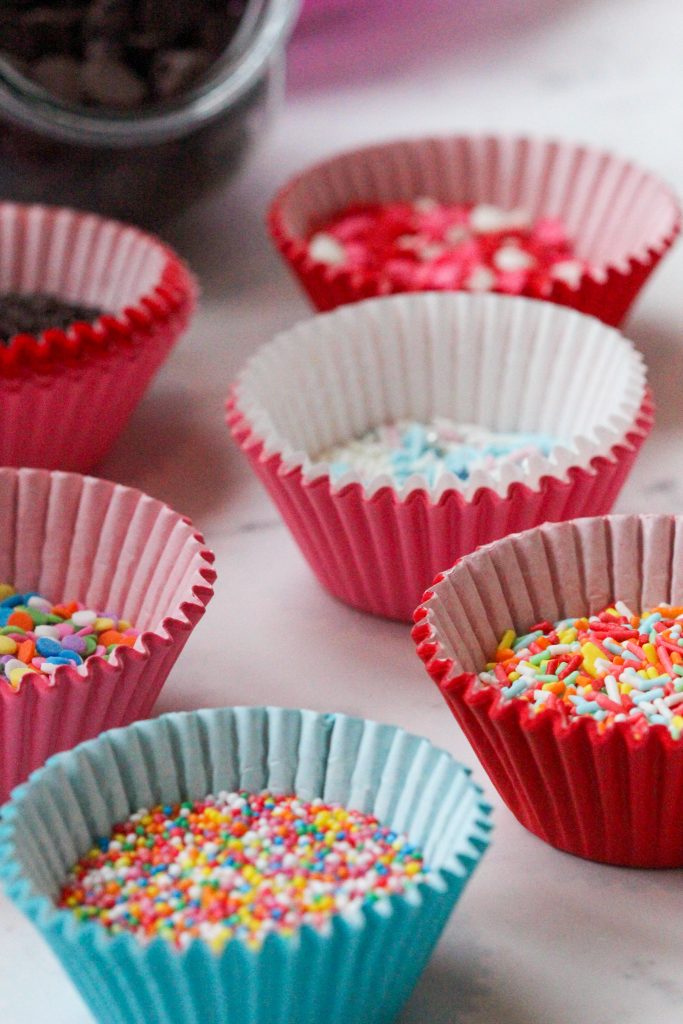
HERE ARE SOME DECORATING IDEAS
Below are some of my favourite ideas but don’t feel limited by my ideas, you could come up with your own signature chocolate dipped waffle cone!
- Chopped nuts
- Sprinkles (100’s & 1000’s)
- Funfetti
- Toasted coconut
- Chocolate hail
- Jimmies
- Crushed cornflakes
- Chocolate chips
- Colored sugar
- Crushed pink smokey’s
- Crushed sherbet lolly’s
HOW TO MAKE CHOCOLATE DIPPED WAFFLE CONES?
- Prepare a tray with baking paper and set it aside.
- Then melt the chocolate and coconut oil in the microwave at 30 second intervals until the chocolate has melted. Mine took 1 ½ minutes to melt. Then set aside to slightly cool.
- Whilst the chocolate is cooling start preparing your decorations. Simply put your choice of decorations into little shallow bowls or cupcake papers and set aside.
- Once the melted chocolate has cooled a little, begin dipping the cones into the chocolate and let them drip a little to get the excess chocolate drip off them.
- Then use your hands to sprinkle over the decorations straight onto the wet chocolate waffle cone and place them on a tray with baking paper to set.
- Once all the cones have been dipped in chocolate and sprinkled with your choice of decoration, chill them in the fridge to set or until ready to serve.
That’s it!
Yippee your all set to go for a great little summer dessert……now where’s Summer!! Only 2 months to go! Arrrgghhh!!
My book Laying Gods Table has many more yummy recipes for you to enjoy! Please click on link to get yourself a copy.
For ideas and tips on how to practice hospitality please read my blog post 5 tips for practicing Christian Hospitality. It will give you ways on how you too can demonstrate God’s love in action.
As always I would love to hear from you! If you’ve tried this recipe and like it please leave me a comment below.
Loves, Richelle xxx
The post Chocolate Dipped Waffle Cones appeared first on Laying God's Table.
]]>The post No-Churn Mint Chocolate Chip Ice Cream appeared first on Laying God's Table.
]]>Let’s get you ready for summer by bringing a classic mint and chocolate flavor together, that is by all accounts one of the creamiest and totally indulgent ice creams that you’re going to consume. Add in some chocolate dipped waffle cones, and walaah you’re ready for summer!!
The mint chocolate chip flavor is traditional, and very popular here in NZ, essentially, it’s an all-round favorite!
And once you start to lick this flavor bomb, you’ll remember why you love it so much!
You can make this luscious ice cream in only minutes and the bonus here is that no ice cream maker is required! Its effortless and painless and all you need is a beater and 5 ingredients……no sweat!
So, what does no churn really mean? Let’s dig a little deeper as I explain the mysteries around no churn ice cream!
WHAT DOES NO-CHURN MEAN?
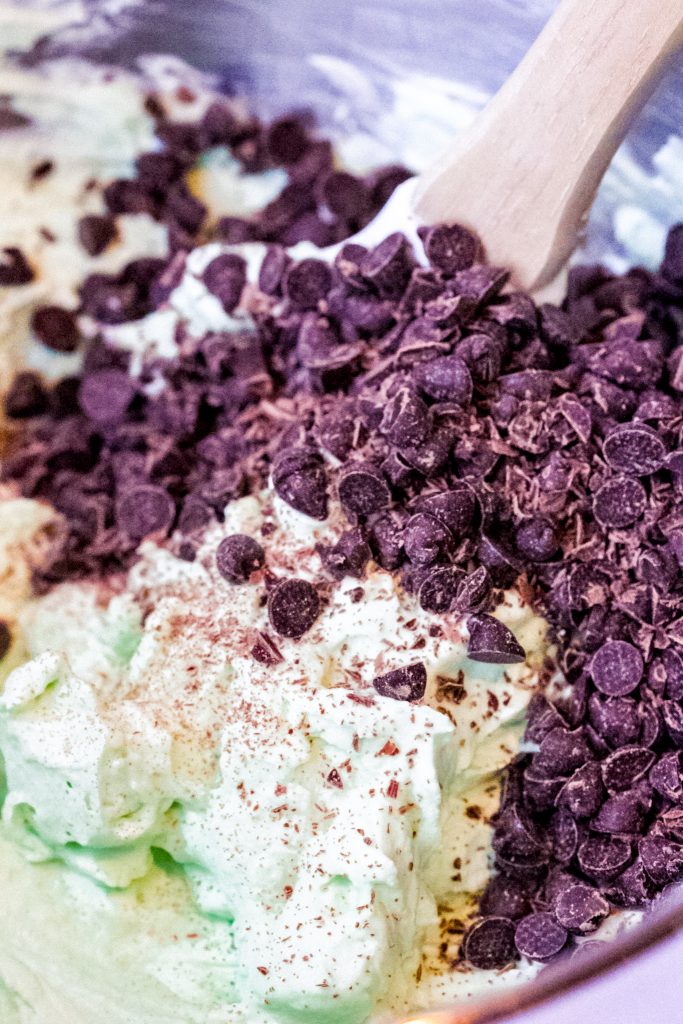
A no-churn ice cream basically means there is no need for an ice cream machine. A no-churn ice cream is essentially 2 ingredients – whipping cream and sweetened condensed milk which is folded together to form an ice cream base. From there you add additional ingredients to create different flavors and color combinations. In this case our additional ingredients are peppermint essence, green food color and chocolate chips.
WHAT IS AN ICE CREAM BASE?
An ice cream base is made up of 2 simple ingredients. That means that you have your staple ingredients that never change and that’s your base recipe.
They are:
- 500mls cream
- 1 can sweetened condensed milk
From this ice cream base, you can now add flavor and color combinations to suit your taste buds. There are many combos that you can create and some classic ones too!
For example, if you wanted to create vanilla ice cream you would just add vanilla essence to your ice cream base. That’s it! It’s pretty simple eh!?

TIPS FOR MAKING THE PERFECT MINT CHOCOLATE CHIP ICE CREAM
Before you start making your mint chocolate chip ice cream, I want to share some tips that will ensure you get a creamy and perfect ice cream!
THE CHOCOLATE
For this recipe I used dark chocolate chips. You could also use a bar of chocolate roughly chopped, or chocolate buttons are fine too. And if you didn’t have dark chocolate on hand, milk and white would also be delicious.
THE PEPPERMINT ESSENCE
There are a few more brands on the supermarket shelf than there used to be, however I still gravitate towards good old Hansell’s Peppermint Essence. It has a yummy fresh peppermint flavor and an old classic that you can rely on.
THE COLOR
To get the creamy minty green I used Wiltons Kelly Green. These are a range of gel colors. They are quite potent and go a long way, so you only need a small, teeny tiny amount.
HOW TO MAKE NO-CHURN MINT CHOCOLATE CHIP ICE CREAM
- CHILL THE BOWL – Start by chilling the bowl you intend on using to make the ice cream. I chill mine in the fridge for about 30 minutes.
- PREPARE THE CONTAINER – Prepare your container that the ice cream is going to go into to. This will in turn will be placed in the freezer. For this recipe I used a loaf tin. You could also use a 2 litre plastic container or a 2 litre serving dish or bowl (making sure you have a cover for it, either a beeswax cover or a lid) This will help set the ice cream.
- SLOWLY BEAT YOUR CREAM – In your chilled bowl pour in the cream and begin whipping. Start this process slowly so the cream doesn’t splash up everywhere. Once the cream has thickened crank up the speed on high until soft peaks form.
- SOFT PEAKS – Once soft peaks have formed turn the mixer speed to low and slowly pour in the condensed milk until just combined.
- ADDING THE FLAVOR – Now comes the fun! At this point add in the peppermint essence and food color (I used Wilton’s gel in color Kelly Green) and gently mix the peppermint and food color through the ice cream base until you get the flavor and color you desire.
- CHOCOLATE CHIPS – Once it’s all combined, stir in the chocolate chips.
- FINAL STEP – Now the ice cream is created, pour it into your chilled loaf tin, cover and freeze for at least 8 hours, or preferably overnight.
HOW TO SERVE HOMEMADE ICE CREAM
- Firstly, you will need to allow the ice cream to sit at room temperature for 3-5 minutes to soften.
- Use an ice cream scoop to spoon your mint chocolate chip ice cream into bowls, teacups, or in our case onto a chocolate dipped waffle cone – or if you’re a bit cheeky like me, then eat it straight from the container!!
- If you decided to scoop it onto a waffle cone here is my instructions on making chocolate dipped waffle cones.
- Another wonderful idea is to sandwich the ice cream between two rich fudgy double chocolate chunk cookies! Here’s the link to my perfect double chocolate chunk cookies.
Well my lovely friends now you know how easy it is to make no-churn ice cream, go get some cream and condensed milk and go forth and make your very own!
Here’s my book Laying Gods Table . It has many more heavenly ice creamrecipes for you to enjoy! Please click on link to get yourself a copy.
For ideas and tips on how to practice hospitality please read my blog post 5 tips for practicing Christian Hospitality. It will give you ways on how you too can demonstrate God’s love in action.
If you’ve tried this recipe and like it please leave me a comment below. I would love to hear from you! xx
The post No-Churn Mint Chocolate Chip Ice Cream appeared first on Laying God's Table.
]]>The post Banana Salted Caramel Popcorn Cupcakes appeared first on Laying God's Table.
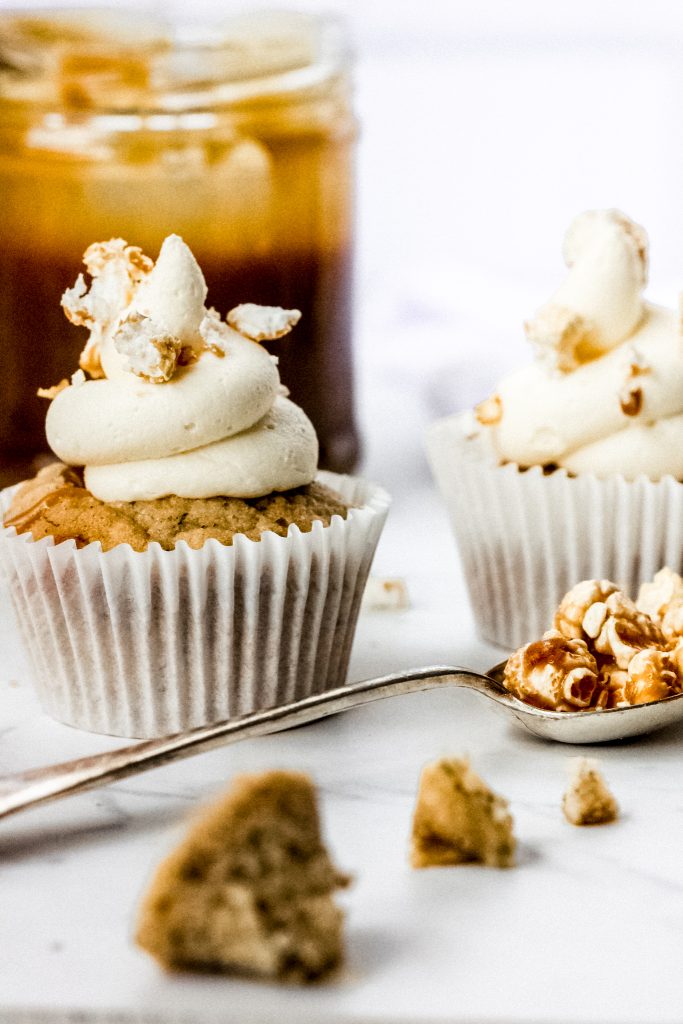
]]>I hope you thoroughly enjoy all the yummy flavors of these banana salted caramel popcorn cupcakes! So, with that here they are!
A few weeks ago, in my local supermarket I stumbled across a most amazing and delicious new flavor called, Butter Popcorn!
This got me thinking about all the flavor combos I could pair the butter popcorn flavor to. And what popped up first, was…you guessed it CUPCAKES!!
Now to make the whole thing come together perfectly I remember I had some ripe bananas sitting on the kitchen bench, so with that the genius thought came to mind, and banana salted caramel popcorn cupcakes were born!
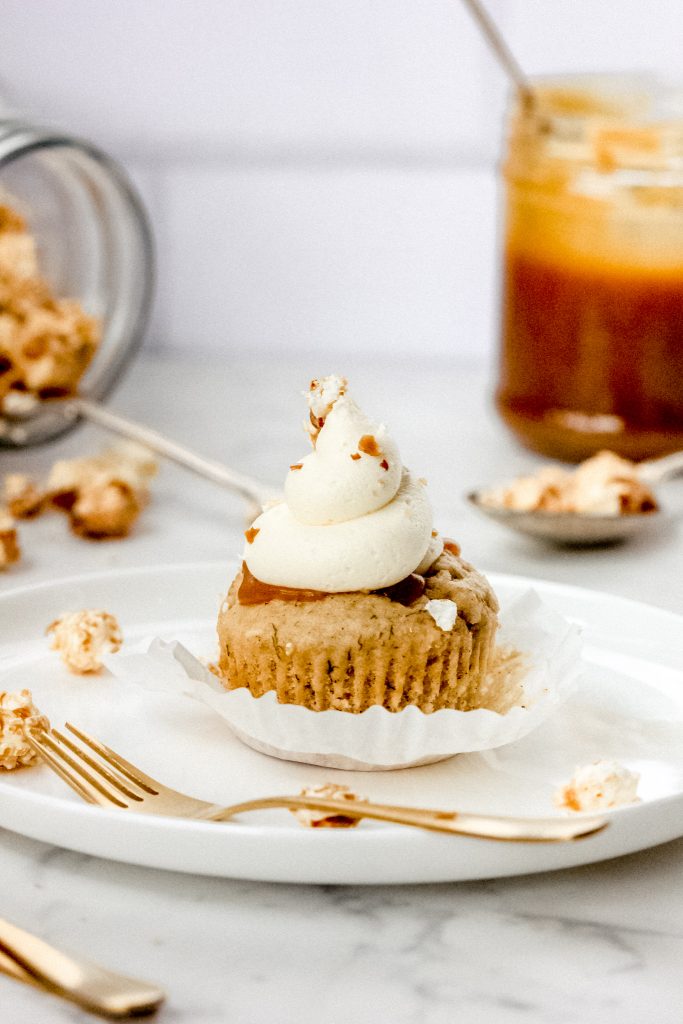
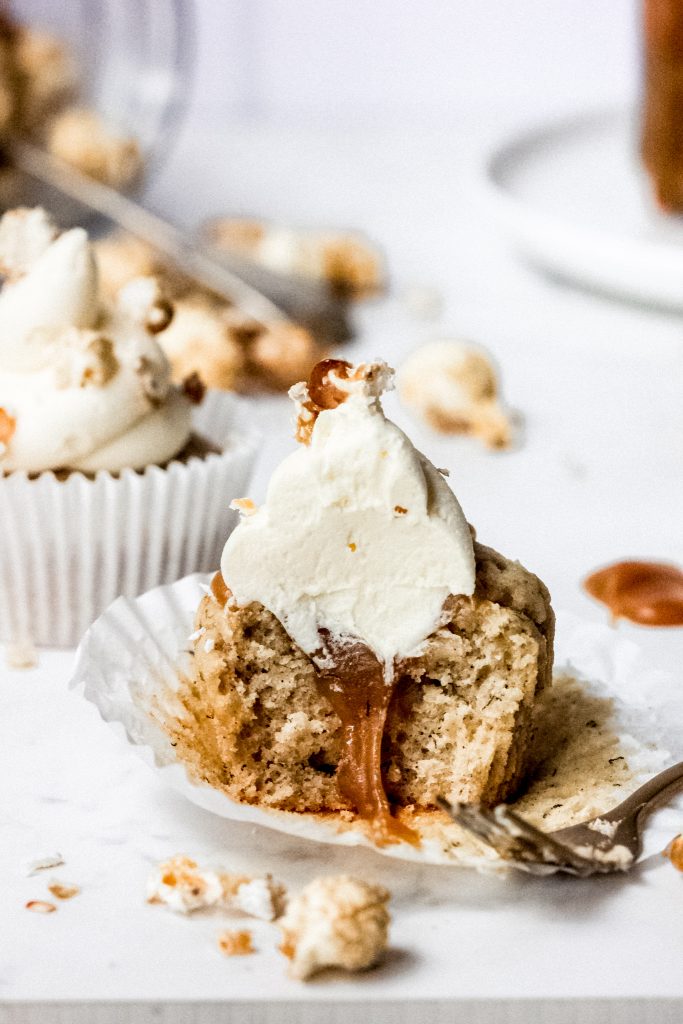
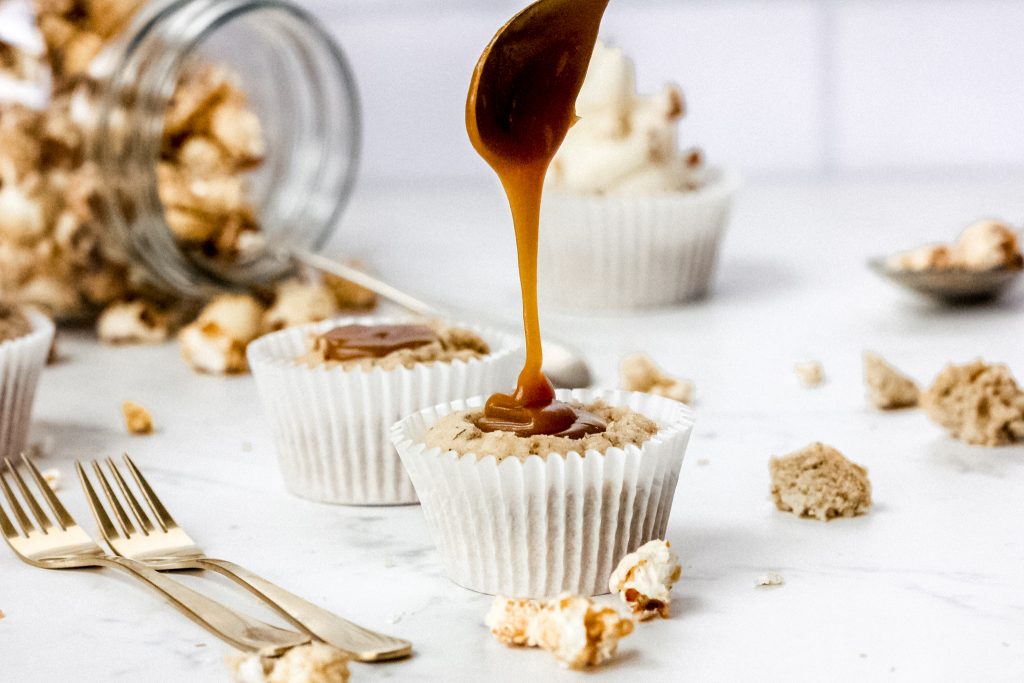
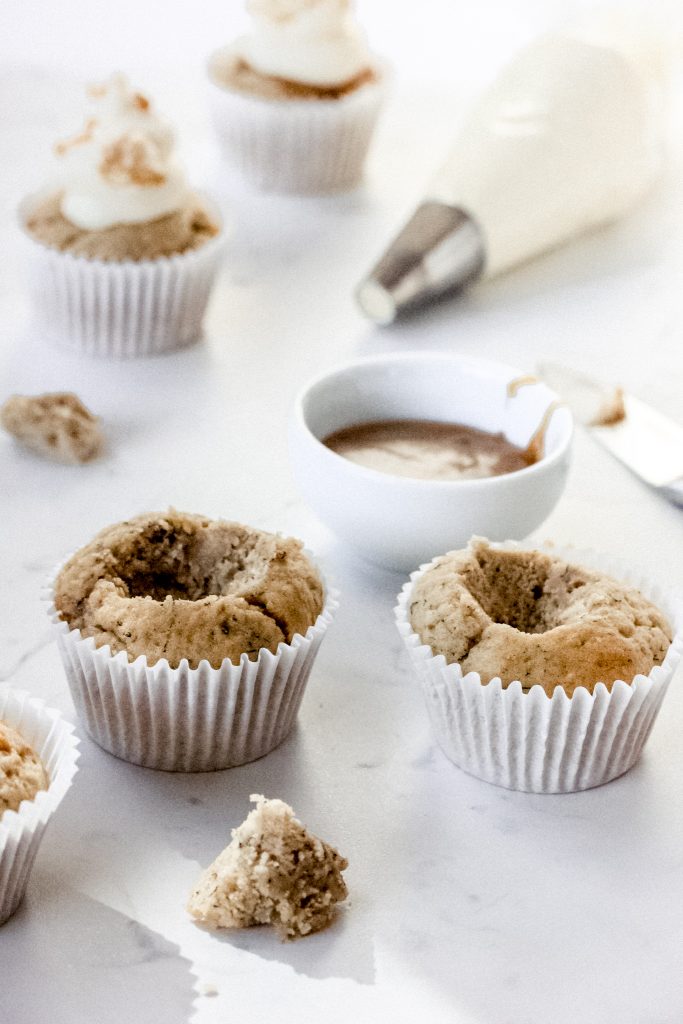
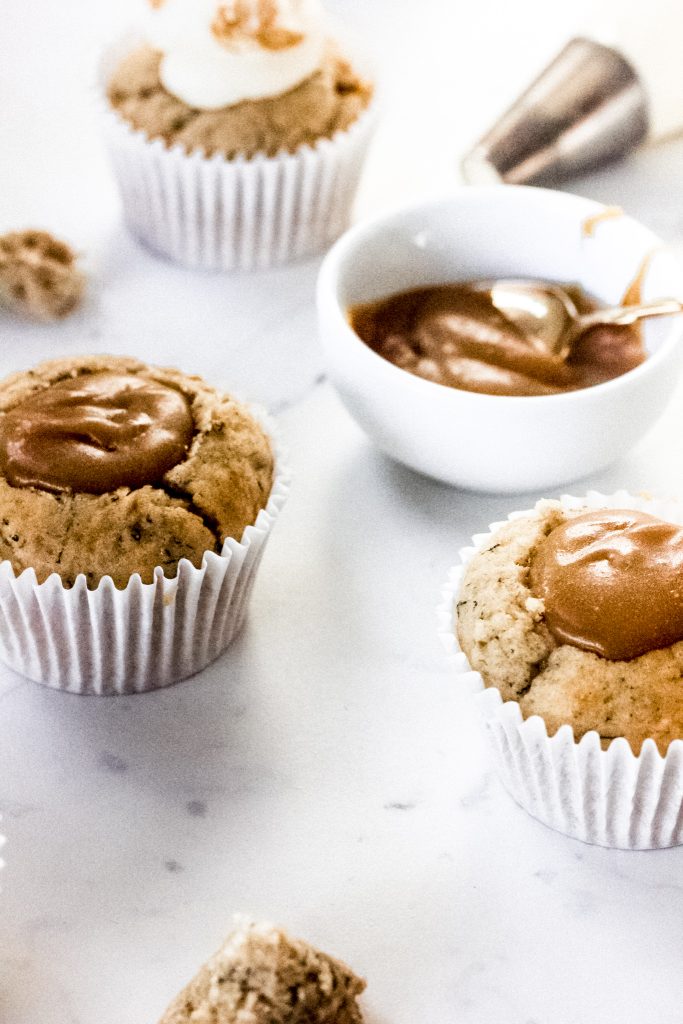
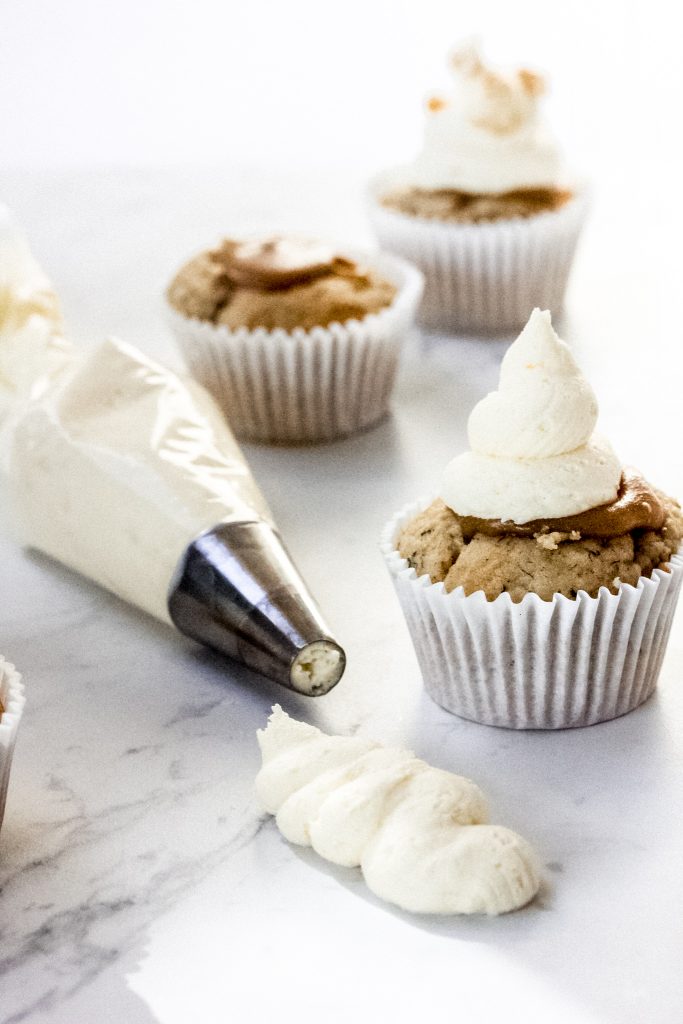
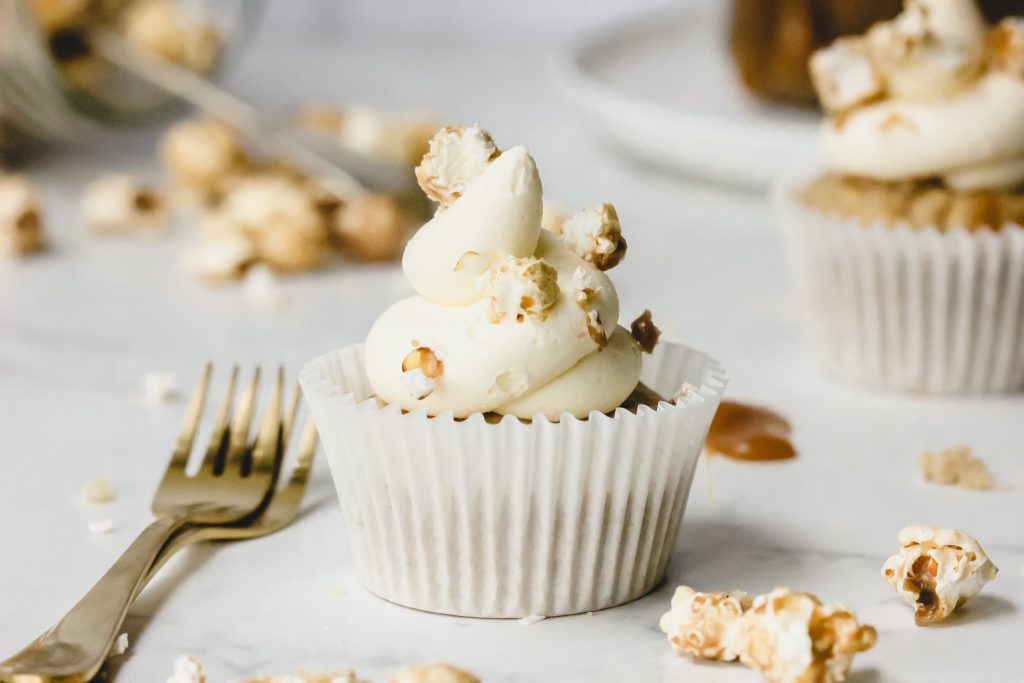
Let me tell you about these yummy cupcakes. They are soft, light and fluffy with a pronounced banana sweetness. I filled each cupcake with my signature salted caramel, which I must confess is the perfect texture……gooey and caramelly excellent to fill cupcakes with. Then came the piece de resistance……the butter popcorn frosting. You will want to eat this frosting all on its own cause it’s that good, but now’s a good time to practice self-control!
The butter popcorn frosting is creamy and featherlike in texture which makes it the superb accompaniment to cupcakes! I swirled the frosting onto the salted caramel filled banana cupcakes added some crushed salted caramel popcorn and took my first bite. If I didn’t know it, I’d think I was in wonderland! It was sooooooooo good!!
HERES WHAT I LOVE ABOUT THESE CUPCAKES!
Who doesn’t LOVE a combination that pairs salted caramel with banana and butter popcorn! That sure is one reason I love these cupcakes! And there’s many more reasons why I love these cupcakes, let me share.
THE FROSTING
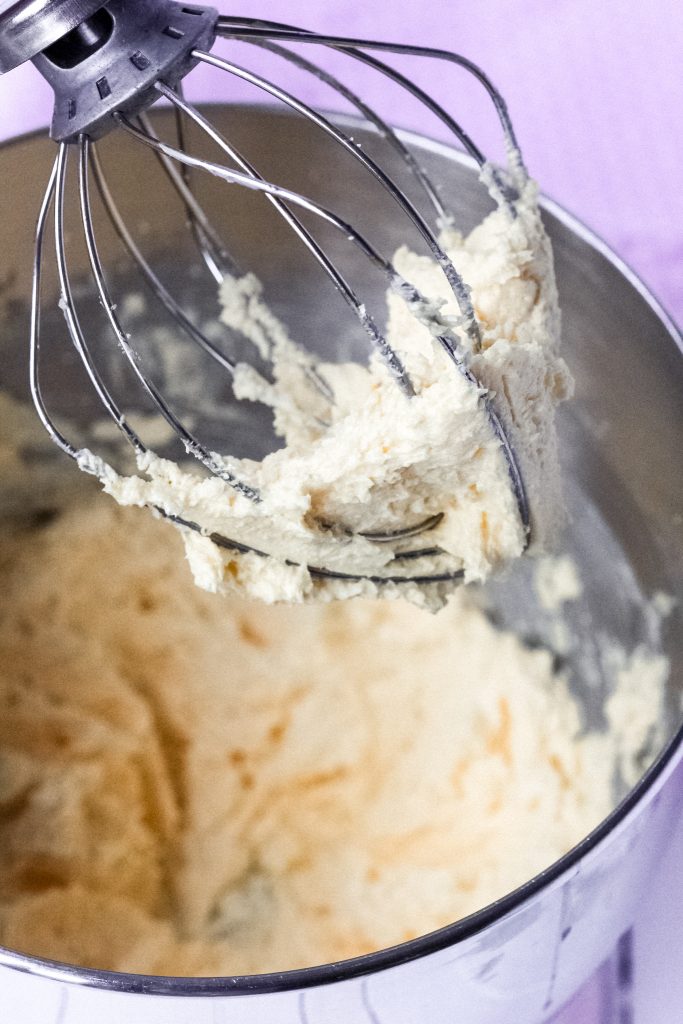
This frosting is so good you could spread it on toast, and it would still be amazing. Here’s the secret to getting the creamiest frosting? You whip it till the cows come home (which in reality is about 4-6 minutes).
The reason for this is the longer you whip it the creamier and fluffy it becomes, making it faultless to top cupcakes with.
You could use a spatula or a spoon to smooth the frosting onto the cupcake, or you could use a piping bag and a tip to give them that café style look. (I used a Wilton 1A to get that snowy, creamy look to my cupcakes). Remember to cool your cupcakes completely before frosting.
THE FLAVOR COMBO
Banana, salted caramel and popcorn…hello!! These flavors are fantastic together but believe it or not the star of this show is the…. Salt! The flaky salt enhances the depth of flavor to the cupcake, bringing the caramel and banana to new heights of sublime luxury. For this recipe I used Maldon Flaky Salt.
VERSATILITY
This recipe can be made into a layer cake or a smaller batch of cupcakes. If making it into a layer cake it requires 3x 18cm cake tins. If making it into a smaller batch of cupcakes simply half the ingredients remembering to half the frosting also.
HERE ARE MY TOP TIPS TO GET THE PERFECT CUPCAKE!
1. CUPCAKE LINERS
Not all cupcake liners are created equal. I have tried different ones over the years and for some reason unbeknown to me once the cupcakes are cooked, they tend to come away from the cupcake papers. So, my go to cupcake papers are GO BAKE cupcake papers. These have never failed me, and you can get them in sorts of colors to match your cupcake theme.
2. ROOM TEMPERATURE
Take the butter and eggs out the night before and let them come down to room temperature before starting to bake.
3. SECRET WEAPON
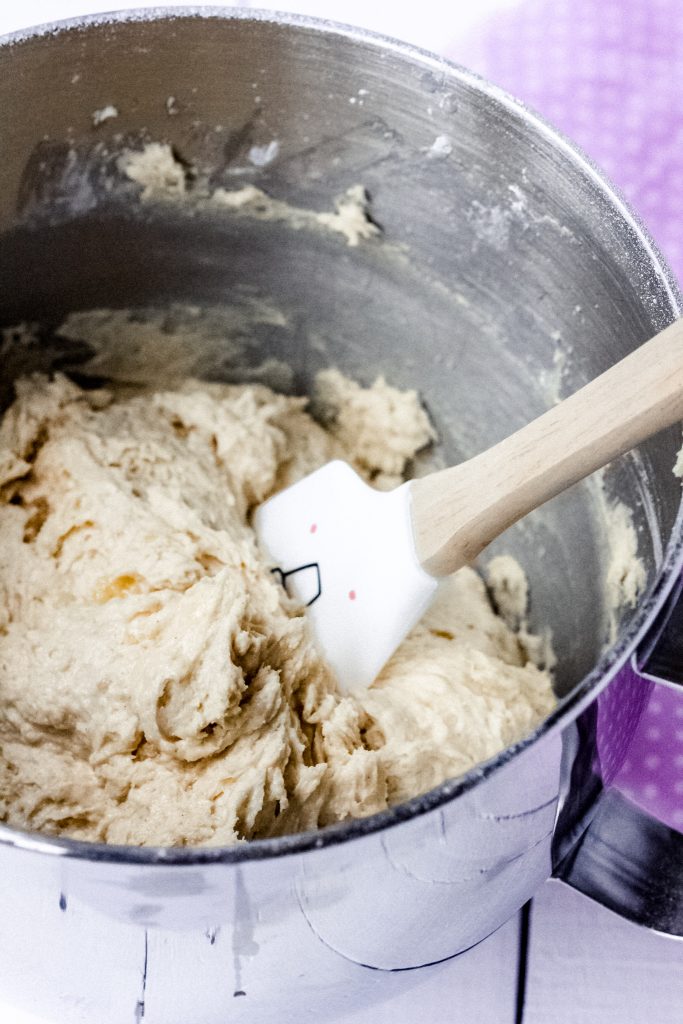
I bet you want to know my secret weapon, ok I’ll divulge. My secret weapon is I use the beater attachment on my Kitchen Aid for both the cupcake batter and the frosting (not the paddle). The reason for this is I get a more whipped and fluffy texture to my cupcakes and my frosting, which in turn is better for EATING!! Note: You could also use a handheld beater, here’s my recommendation here.
4. FIRST THINGS FIRST
Make your salted caramel first and at least 2 hours before you are ready to fill your cupcake cavities. This will give the caramel time to cool and set just enough so that’s it’s not a runny mess, but instead you get a sticky and gooey texture perfect to fill your cupcake cavity.
5. DON’T OVERFILL
Don’t over fill the cupcake liners. To avoid overflowing use an ice cream scoop to spoon the same amounts every time, and make sure you only fill the cupcake papers about 2/3 full, nothing worse than a cupcake overflowing out of the liner and onto the tin!
6. DON’T OVERBAKE
Cupcakes are ready when a baking skewer comes out clean. Then transfer them immediately to a wire rack to cool. This will stop them from overbaking and becoming dry and hard.
Now let’s get into this! Go make your salted caramel, then bake your banana cupcakes, whip up your butter popcorn frosting and bring it all together for an indulgent, velvety cupcake experience!
My book Laying Gods Table has many more yummy cupcake recipes for you to enjoy! Please click on link to get yourself a copy.
For ideas and tips on how to practice hospitality please read my blog post 5 tips for practicing Christian Hospitality. It will give you ways on how you too can demonstrate God’s love in action.
As always I would love to hear from you! If you’ve tried this recipe and like it please leave me a comment below.
Loves, Richelle xxx
The post Banana Salted Caramel Popcorn Cupcakes appeared first on Laying God's Table.
]]>The post Peanut Butter & Jelly Ice Cream Sandwiches appeared first on Laying God's Table.
]]>
Do you remember having peanut butter and jam sandwiches as a kid, or perhaps you still have them as an adult…….no judgement from me I still eat them on a fresh loaf of white bread…..yea yea, not healthy I know, but you have to have some pleasures in this world, and peanut butter and jam sandwiches qualify as pleasurable!!
Anyway, that’s what inspired me to share this classic flavor combination with you!
These flavor combinations are not new to New Zealanders, so you going to be right at home as I divulge all the tips and tricks to make the perfect ice cream sandwich!
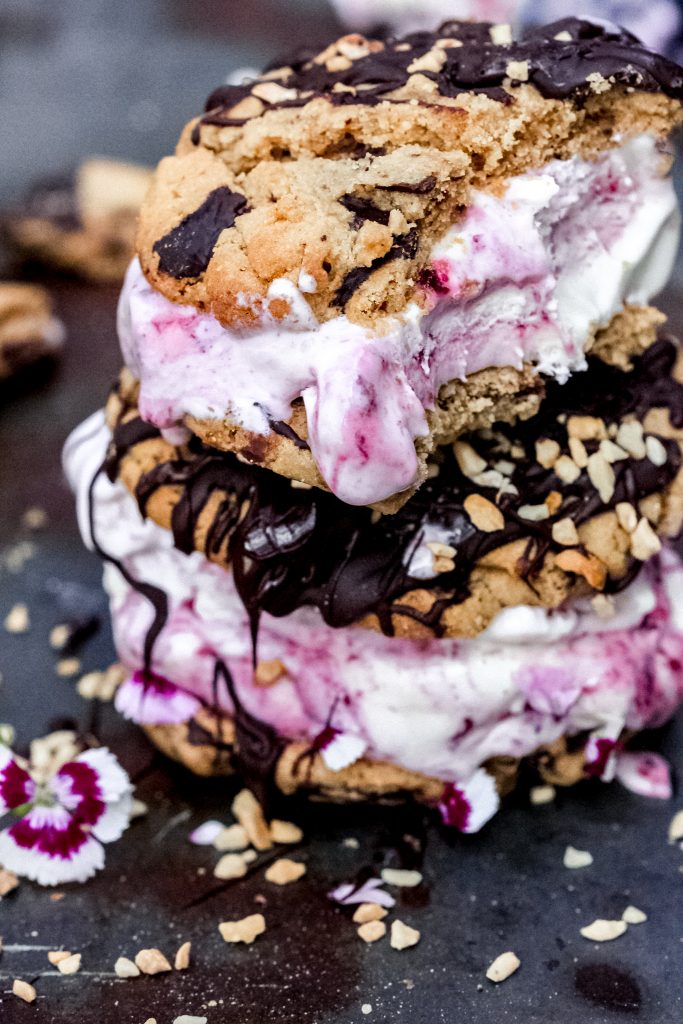
Peanut butter & jelly ice cream sandwiches are a legit way to bring ice cream and cookies together. Peanut butter and jelly are two flavors that work particularly great together and have done for years.
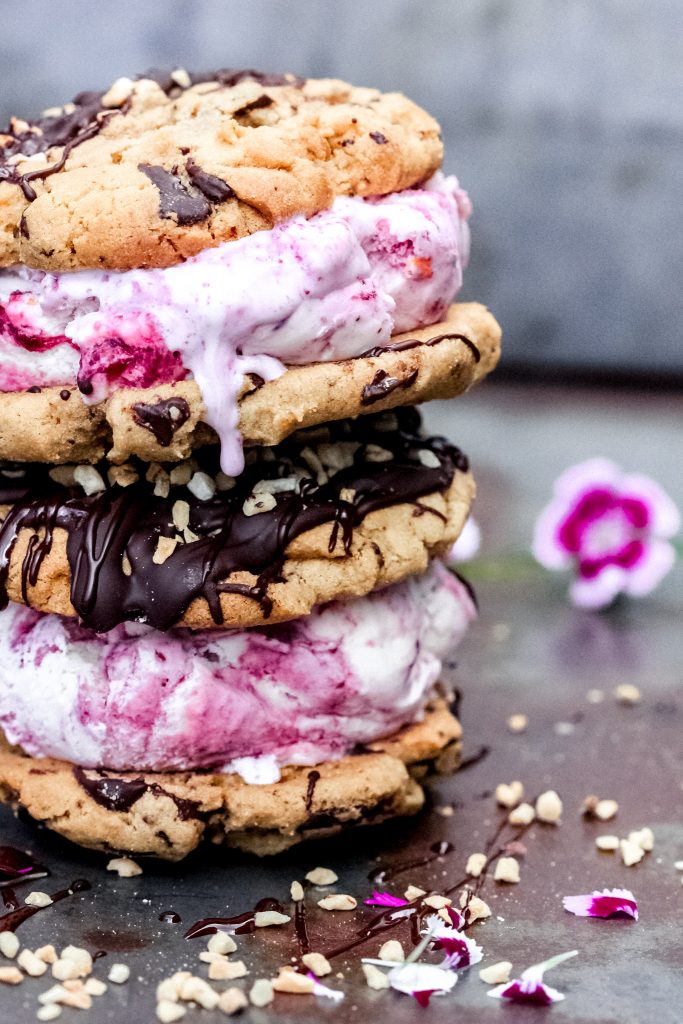
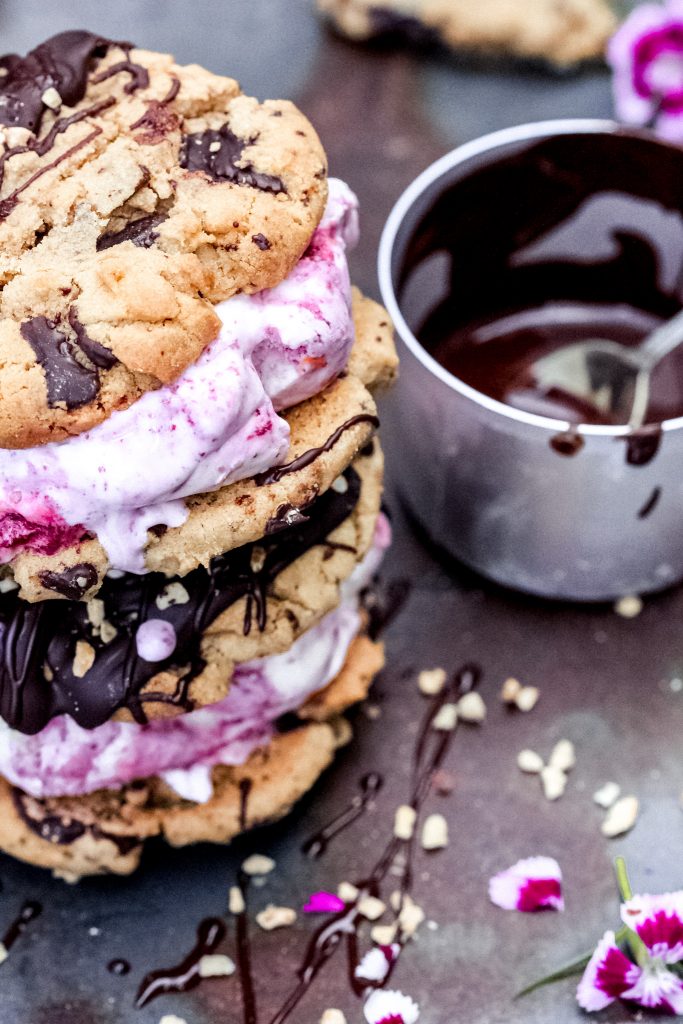
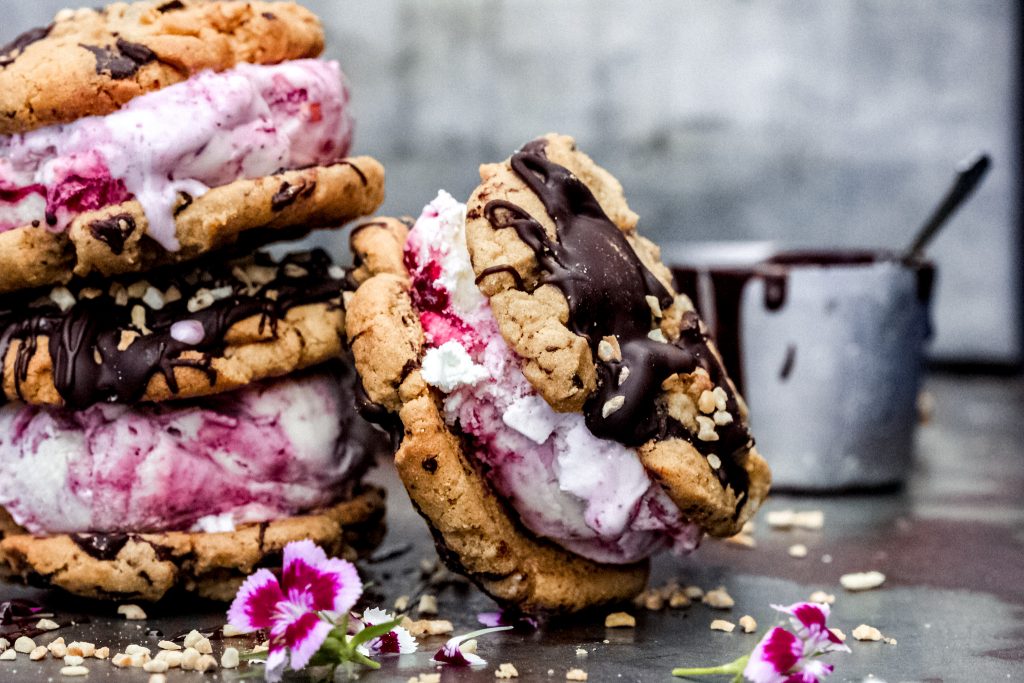
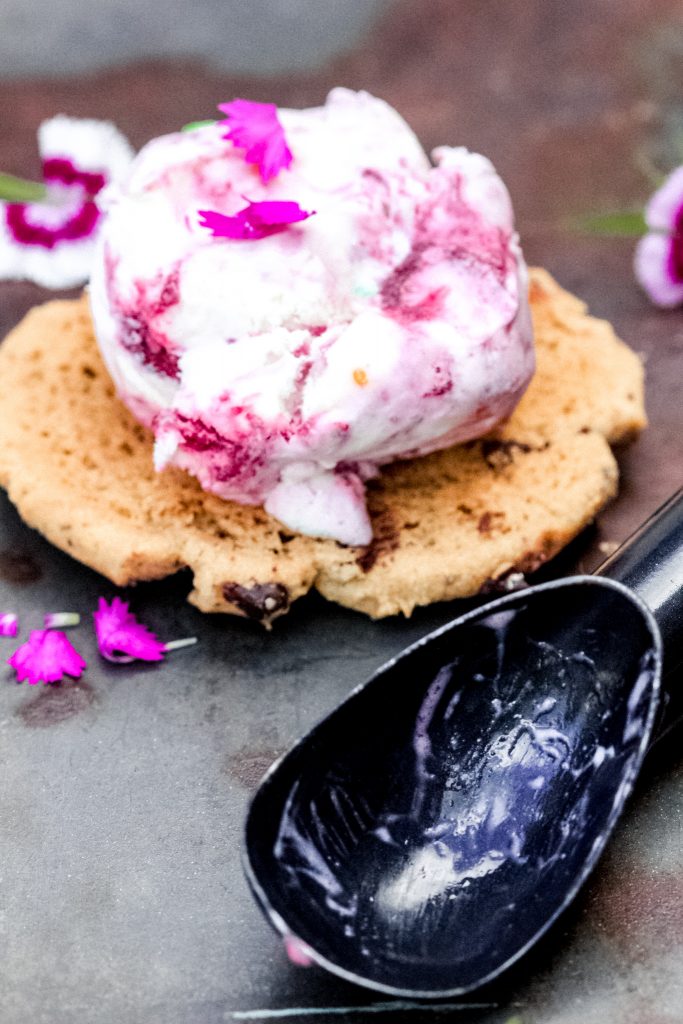
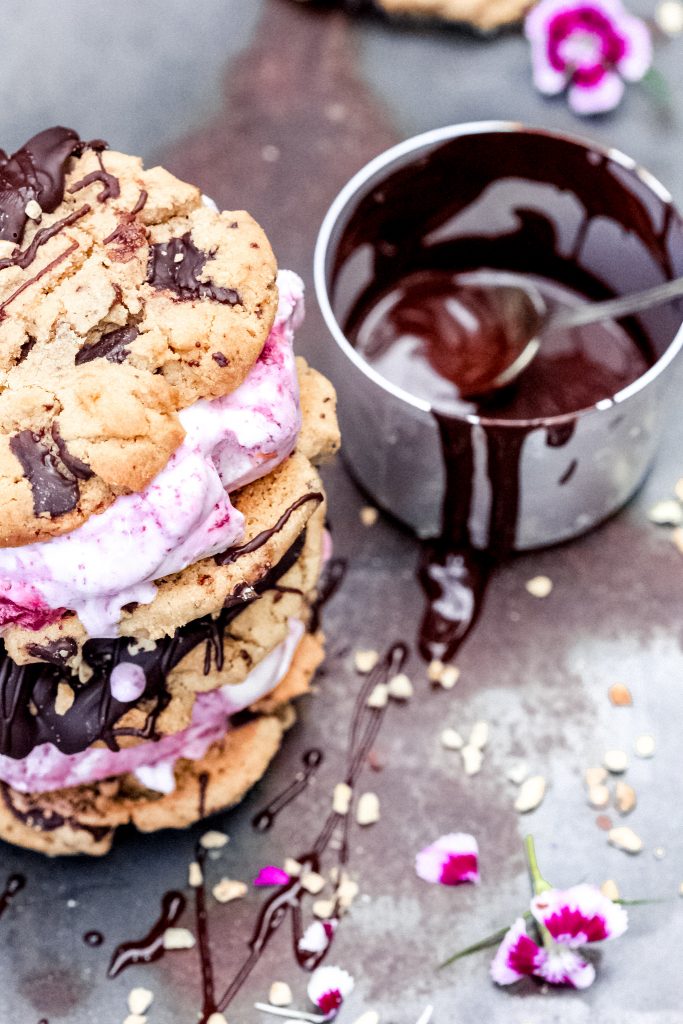
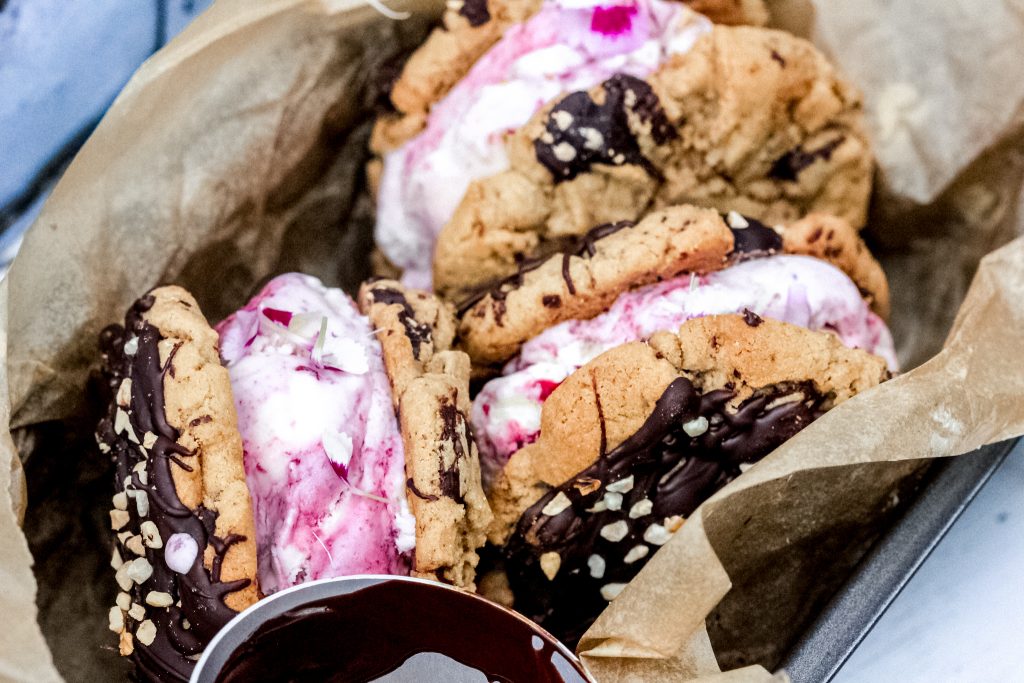
You’re going to LOVE the pairing that has bought these ice cream sandwiches together. A simple creamy boysenberry ice cream sandwiched between the chewiest, chocolatey, salty, soft peanut butter and chocolate chunk cookie……yummo!!
So, without further ado lets crack into it, cause the sooner we do the sooner we can wrap our mouths around these crazy good ice cream sandwiches!
WHAT MAKES A PERFECT ICE CREAM SANDWICH?
The master plan for making the perfect ice cream sandwich is quite easy.
The first requirement is to have a cookie that remains soft enough to be frozen. The reason for this is as you serve your guests these ice cream sandwiches you don’t want them cracking a tooth when they bite into a hard cookie!
Next is in the assembly of the ice cream sandwich. Once you have made the ice cream sandwiches, allow them to freeze in the freezer for a while (at least 1 hour) in a square tin lined with baking paper. This will give the ice cream sandwiches a chance to become cohesive to each other before you hand them out to your guests for eating.
Here’s the good news, with a little planning ahead of time, this will all become very easy to accomplish.
HERE’S WHY I LOVE THESE HOMEMADE ICE CREAM SANDWICHES!
I particularly love these because of the flavor bomb that is peanut butter and jelly! You just can’t go wrong! The flavors infused together aren’t too sweet, but they are sweet enough to know that you are eating something seriously yummy!
So, here’s my view on why I LOVE these ice cream sandwiches:
CROWD FAVORITE
Because peanut butter & jelly ice cream sandwiches are a crowd favorite, that makes them popular if you wanted to serve them at your backyard party or a BBQ.
COOKIE BAR
You could create and Ice cream cookie bar, the kids will go crazy over these treats, you might need to bring them out after dinner, otherwise dinner might not get eaten!!
BIRTHDAY PARTY, BRIDAL OR BABY SHOWER
Peanut butter & Jelly ice cream sandwiches are a perfect dessert or treat at a birthday party, bridal or baby shower.
PIMP IT UP
Pimp your ice cream sandwiches by dipping them in a hard-shell chocolate and roll them in all sorts of delicious treats like chocolate chips, funfetti, marshmallows, sprinkles, chopped peanut, hundreds and thousands and much more.
VERSATILE
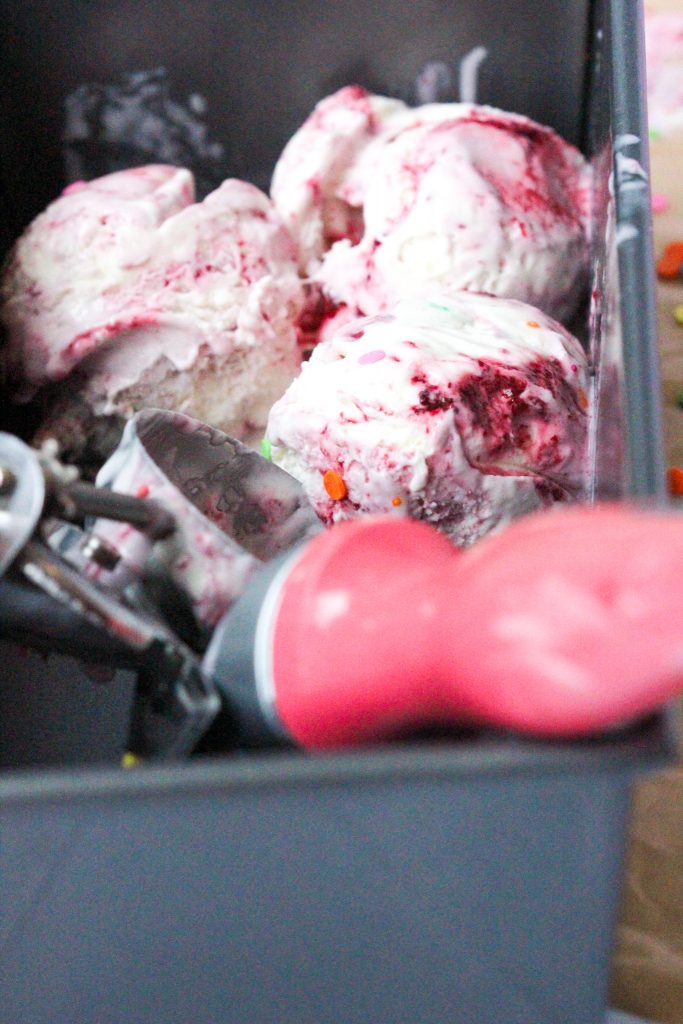
Switch out the boysenberry ice cream for a flavor of your choice. Or purchase multiple flavors to mix n match!
NO CRACKING A TOOTH HERE!
Peanut butter cookies are perfect in texture to make up ice cream sandwiches which will guarantee that your guests don’t crack a tooth on a hard cookie that’s impossible to bite!
TIPS FOR MAKING ICE CREAM SANDWICHES
Before you start assembling the sandwiches, below are some tips that will ensure you get the perfect ice cream sandwich:
- Make sure you chill the baked cookies in the fridge for 1 hour before assembling the sandwiches. If are desperately wanting to eat your ice cream sandwiches before chilling (and I completely understand!) be prepared for a sloppy mess, because if they are still warm then the ice cream will melt.
- Here’s my personal tip. I like to store my assembled ice cream sandwiches in a square baking tin lined with baking paper so that they are chilled and ready before my guests arrive.
HOW TO MAKE PEANUT BUTTER & JELLY ICE CREAM SANDWICHES
Firstly, you will need to start making the peanut butter and chocolate chunk cookies. Because your cookies are going to need time for chilling before you make them into ice cream sandwiches.
HOW TO MAKE PEANUT BUTTER & CHOCOLATE CHUNK COOKIES
- Make the cookies following my recipe here
- Once the cookies are baked and cooled leave them in the fridge overnight until you are ready to assemble with the ice cream.
HOW TO ASSEMBLE ICE CREAM SANDWICHES
Please don’t sweat it if this is your first attempt at making your own ice cream sandwiches, they are easy as to assemble!
Here’s how to do it!
- Your cookies will need to be baked, cooled and have been chilling in the fridge for at least 1 hour.
- Then when you’re ready to serve remove the ice cream from the freezer and let it soften for about 3-5 minutes.
- Scoop out the required amount of your favorite ice cream per cookie and sandwich together. Then pop them into the freezer in a baking tin lined with baking paper for 30 minutes.
- Then after 30 minutes go right ahead and SERVE, EAT and ENJOY!
My book Laying Gods Table has many more delicious recipes for you to enjoy! Please click on link to get yourself a copy.
For ideas and tips on how to practice hospitality please read my blog post 5 tips for practicing Christian Hospitality. It will give you ways on how you too can demonstrate God’s love in action.
As always I would love to hear from you! If you’ve tried this recipe and like it please leave me a comment below.
Loves, Richelle xxx
The post Peanut Butter & Jelly Ice Cream Sandwiches appeared first on Laying God's Table.
]]>The post The Best Salted Caramel Sauce appeared first on Laying God's Table.
]]>It’s a perfect sauce for desserts, added into buttercreams, cupcakes and cakes. Or give as a homemade gift for a birthday, or just because!
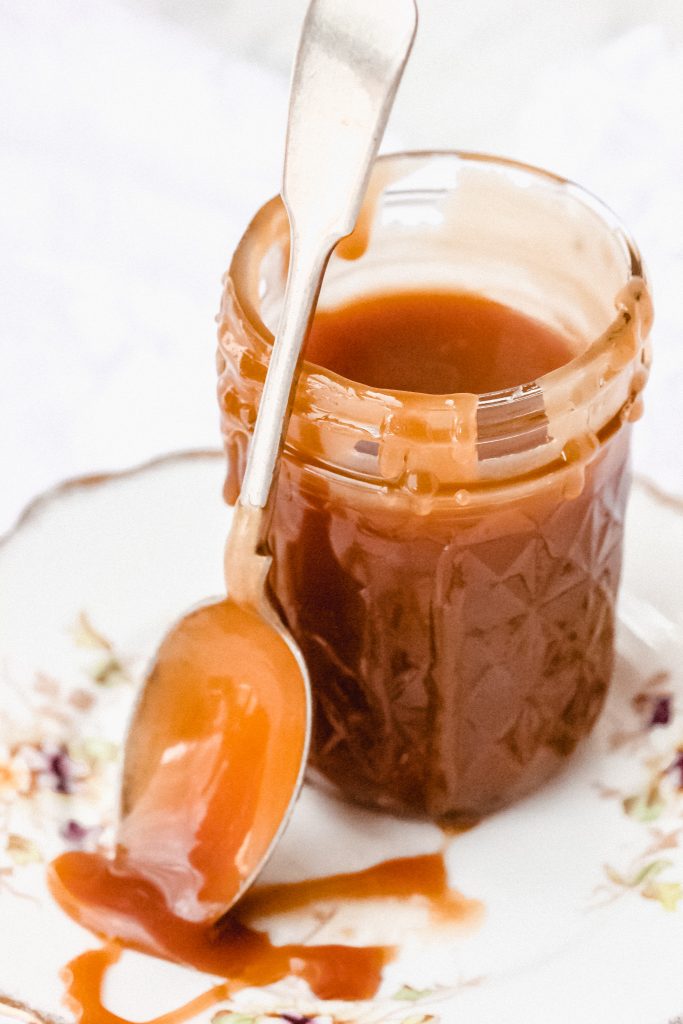
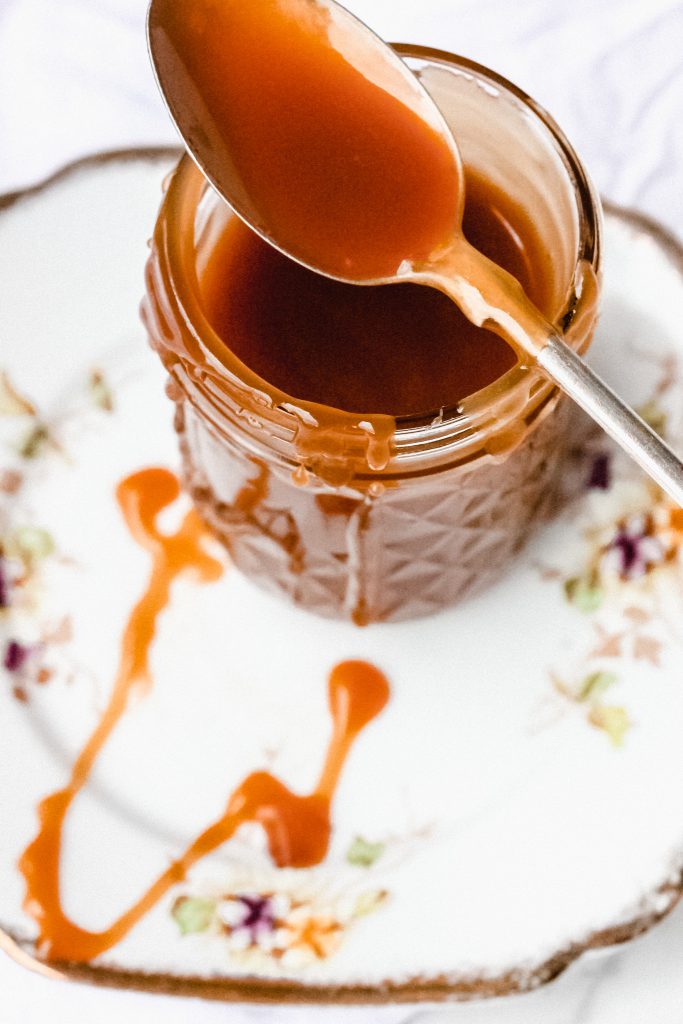
You’re not going to believe it….it only takes 6 minutes to make and doesn’t require a thermometer or fancy pancy ways of creating it? Its just a simple creamy awesome treat that your tastebuds will thank you for!!
WHY THIS SALTED CARAMEL SAUCE IS PERFECTION!
Its perfection because of its versatility to achieve so many ways to utilize itself in recipes, desserts, gifts and even milkshakes! Other than just eating it straight from the jar (which I’ve been known to do on occasion!) take a look below for some interesting other ways to implement your sauce.
SIMPLICITY
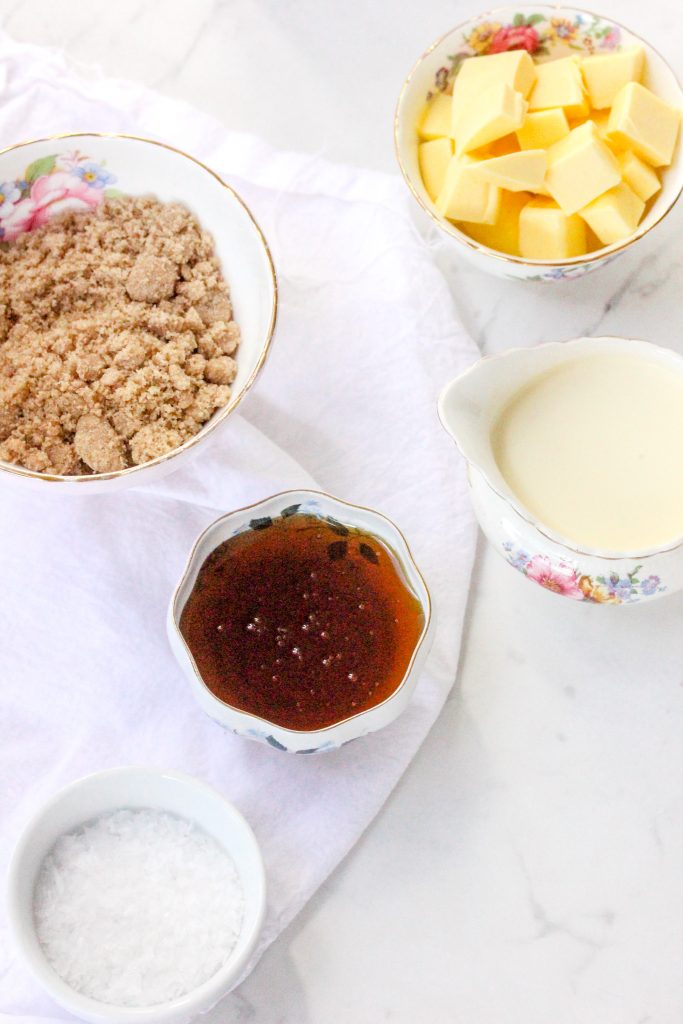
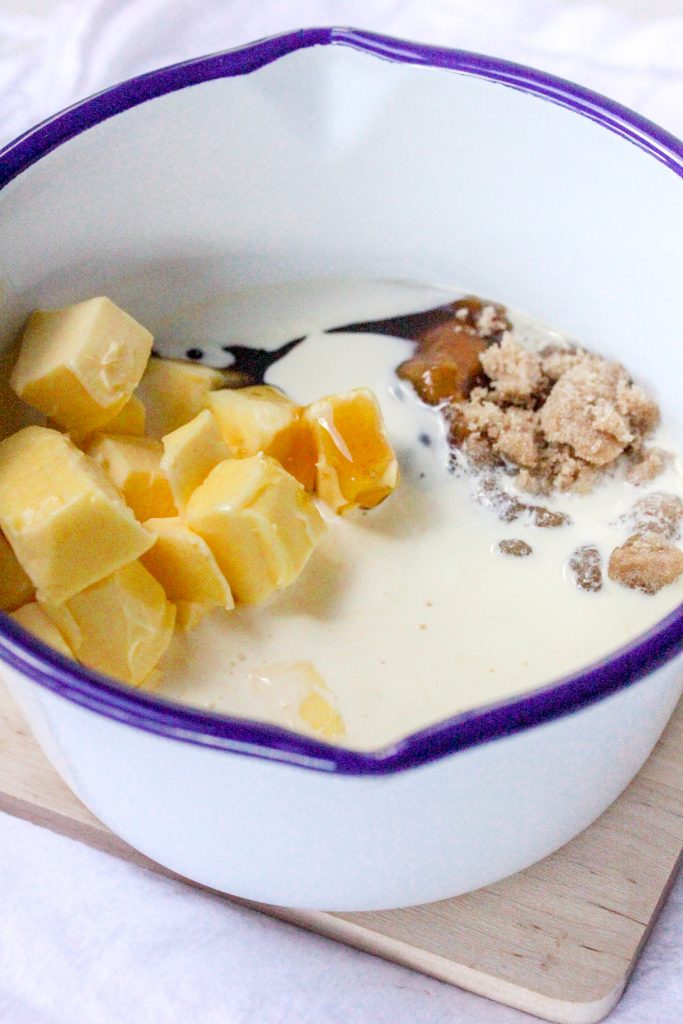
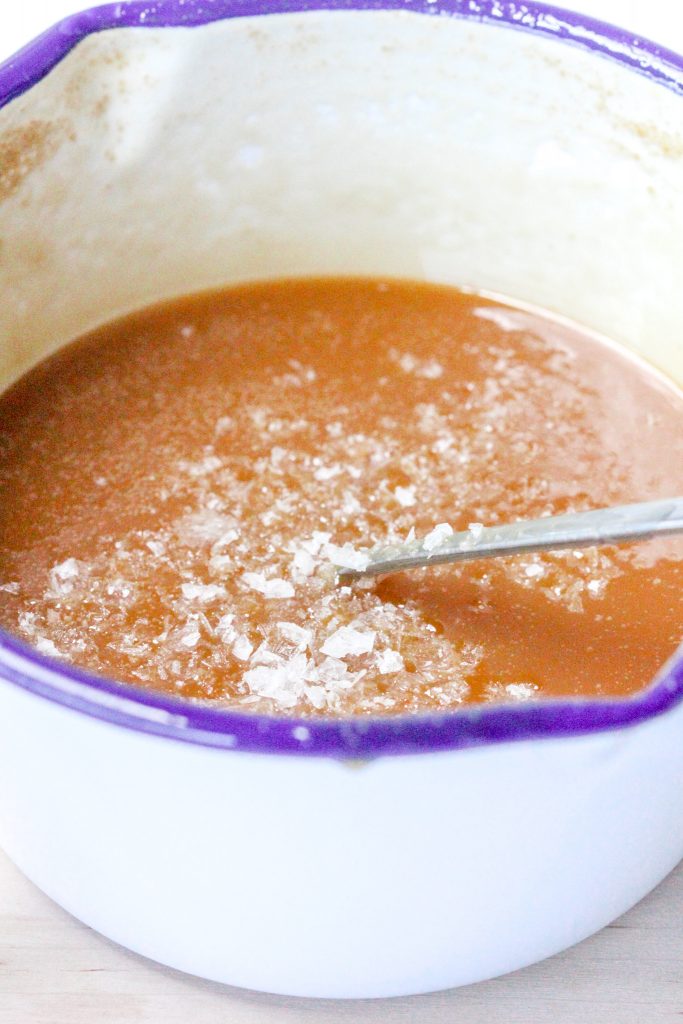
This recipe is very elementary. With only 5 ingredients and only 6 minutes to cook, you’ll be indulging before you know it! The simple ingredients are, butter, brown sugar, golden syrup, cream and flaky salt!
FROSTINGS & ICE CREAMS
I love to add this salty yet sweet sauce into my frostings, buttercream and ice creams. It will elevate the flavors and bring new depths of aroma to your buttercreams & ice creams. Try it for yourself.
FLAKY SALT
Getting the right flaky salt is extremely important…. why you ask? Because if you use the good old table salt, you’re going to get a very different salty taste than if you’d had added in a good quality flaky salt. A good quality flaky salt will add acidity and help bring the sweetness in together as a sweet harmony! I use Maldon Flaky Sea Salt.
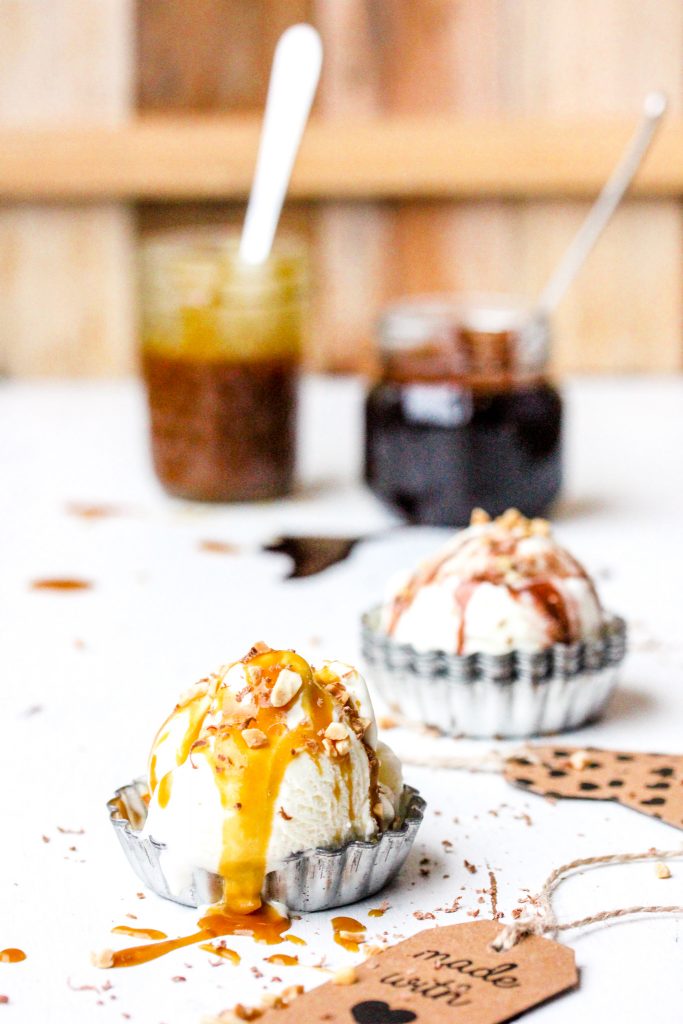
DESSERT
Desserts are another great way to maximize your salted caramel experience. Simply pour the hot sauce over bananas, brownies or your favorite ice cream! YUMMO!!
GIFTS
For a great gift idea simply pour the salted caramel into sterilised jar, allow to cool, then wrap with pretty ribbon and give as a gift to someone special. Attach a little note saying “An ideal accompaniment to ice cream, desserts and cakes”.
CHILLING
If you manage to keep your salted caramel in the fridge for more than 2 minutes hehehe, then you can chill it for several weeks before it needs to be eaten up.
MILKSHAKES
You can’t beat a good salted caramel milkshake! Add 1 tablespoon of salted caramel into your milkshake with a scoop of ice cream and teaspoon of peanut butter….oh my word, that’s too good!!!
CUPCAKES AND CAKES
Utilise your salted caramel even more, but spreading it over layers of your favourite Cakes or filling your Cupcake cavities with giant spoonfuls of yummy gooey-ness!! Arrrgghhh I’m so hungry!!
Well folks I think we can all confess that we’re drooling all over the place right now and dreaming of the creamiest, most decadent, gooey salted caramel sauce going straight into our mouths!!
So, without going on anymore, go get some!
My book Laying Gods Table has many more gooey and fun recipes for you to enjoy! Please click on link to get yourself a copy.
For ideas and tips on how to practice hospitality please read my blog post 5 tips for practicing Christian Hospitality. It will give you ways on how you too can demonstrate God’s love in action.
As always I would love to hear from you! If you’ve tried this recipe and like it please leave me a comment below.
Loves, Richelle xxx
The post The Best Salted Caramel Sauce appeared first on Laying God's Table.
]]>The post Hot Fudge Sauce appeared first on Laying God's Table.
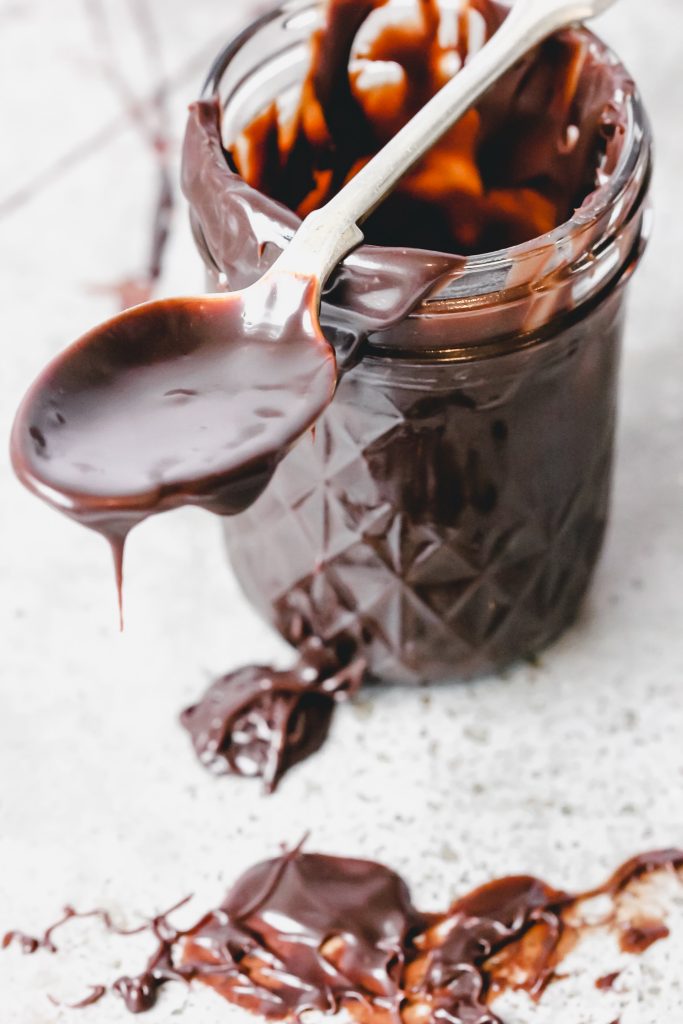
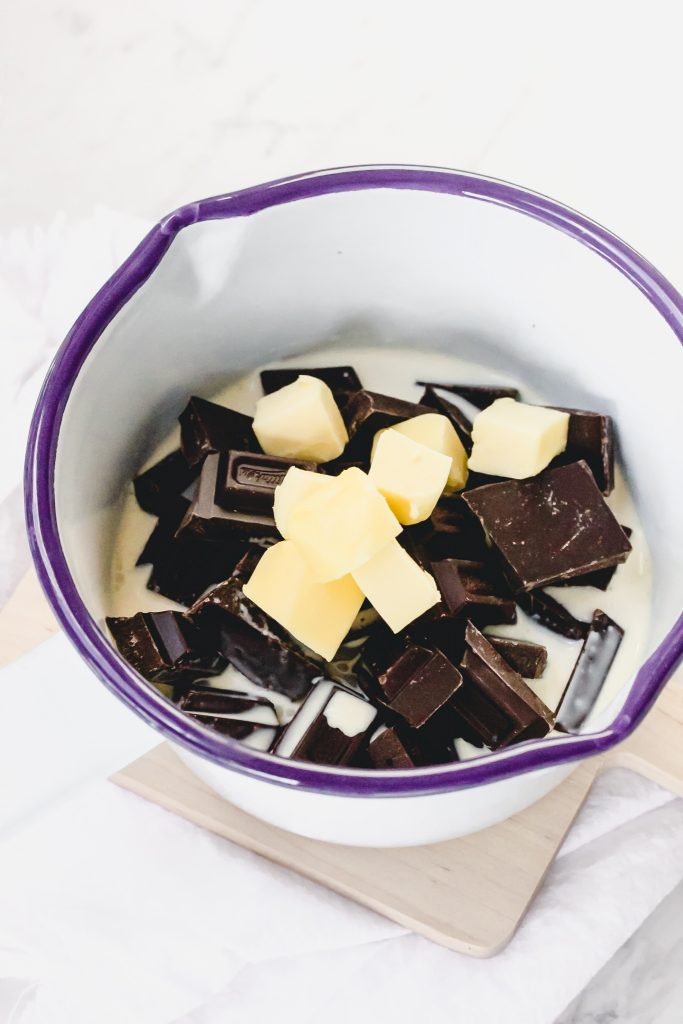
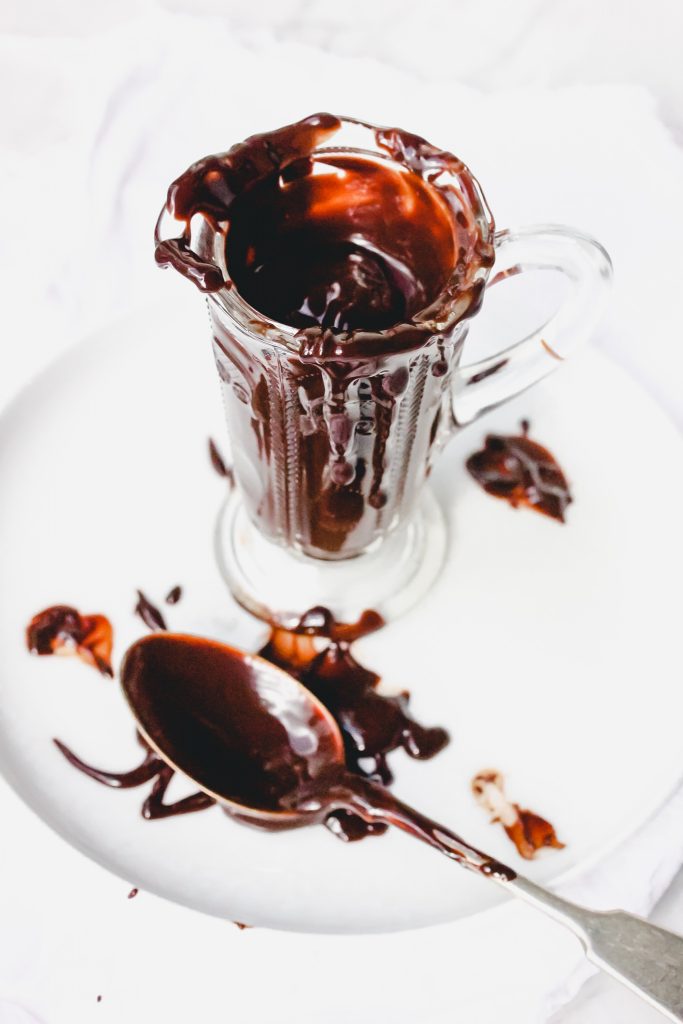
]]>This hot fudge sauce has only 3 ingredients and takes only minutes to make! You will be tempted to eat it before it reaches the dessert! And you will never have to purchase a store-bought chocolate sauce ever again!
It can be kept in the fridge for several weeks and simply heat in the microwave to serve. You can turn it into a ganache for cakes and cupcakes, or into truffles for a decadent treat!
Whatever you choose to do with this hot fudge sauce, know this, this will elevate your desserts to new and greater levels!
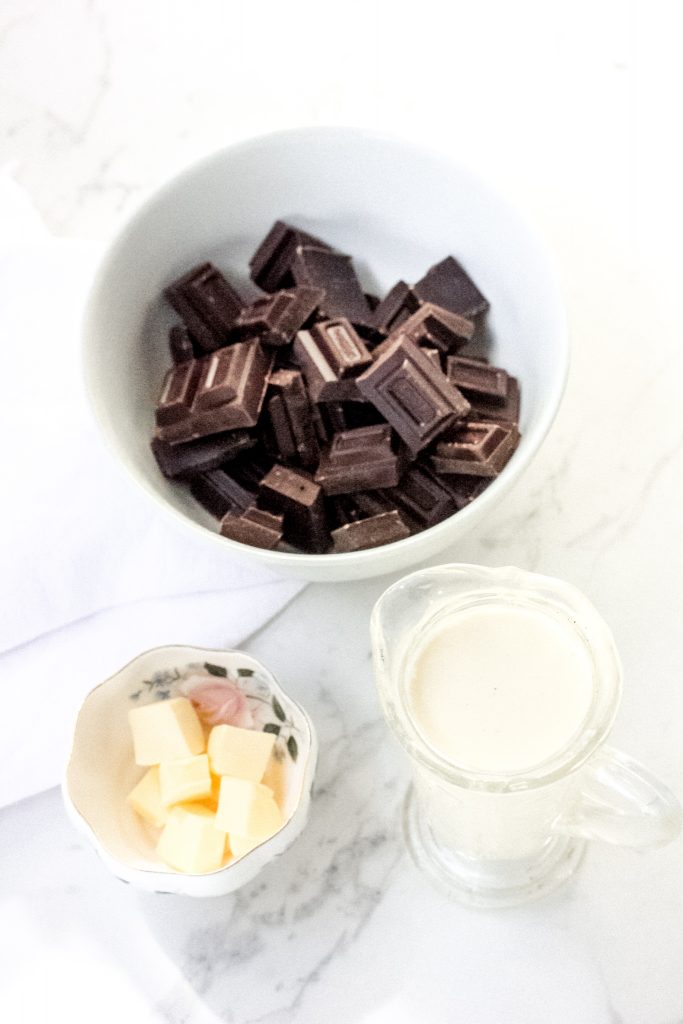
WHAT INGREDIENTS ARE IN HOMEMADE HOT FUDGE SAUCE?
Only 3 ingredients, chocolate, cream and butter, it’s really very simple!
HOW TO MAKE HOT FUDGE SAUCE?
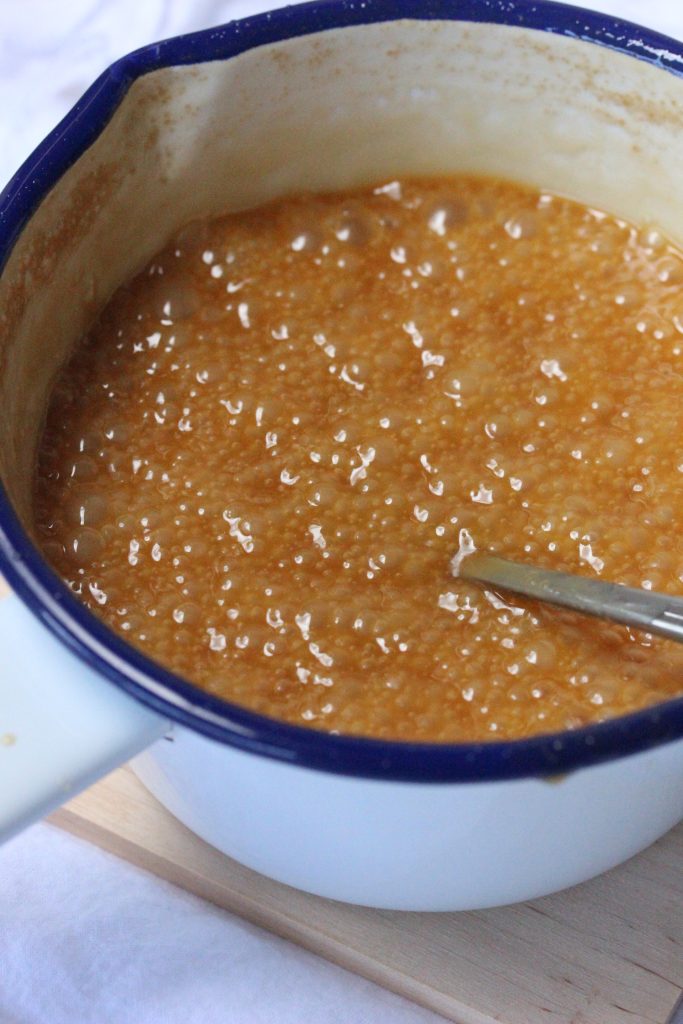
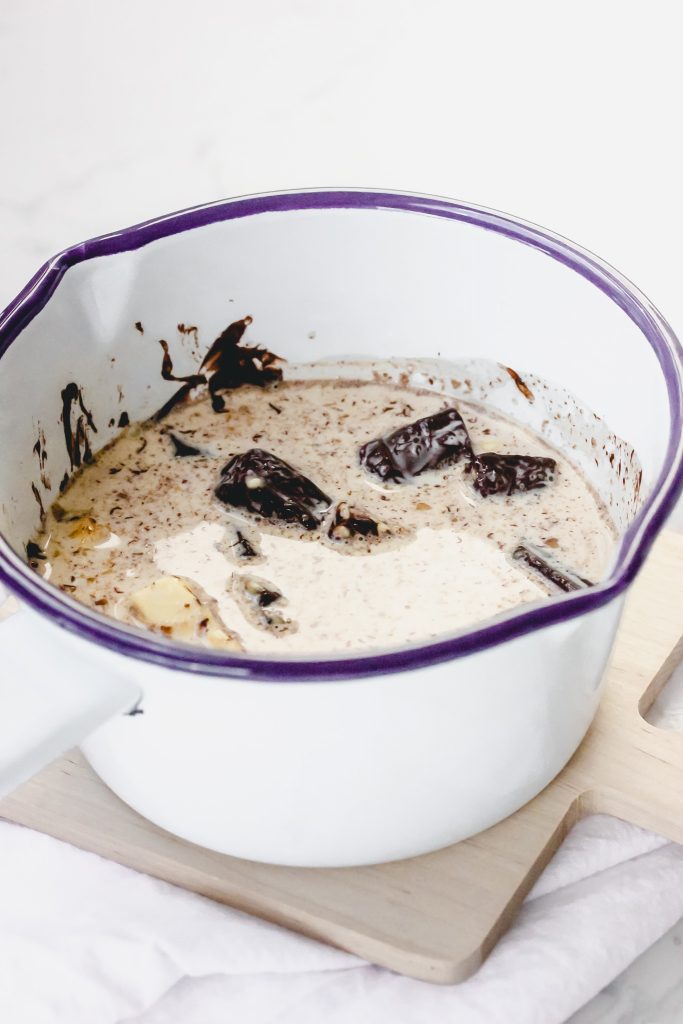
- Simply add all ingredients into a small pot on the stove and gently heat.
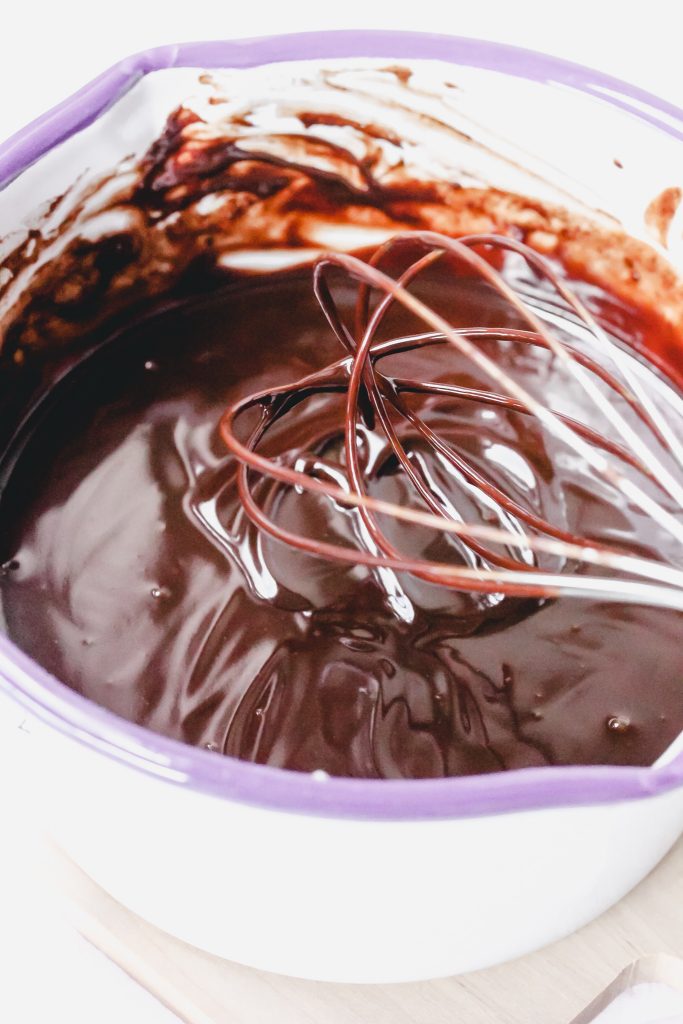
- Then whisk the melted ingredients together to form a velvety rich chocolate fudge sauce.
There’s no secret to this, it’s just plain old delicious and easy!!
WHY IS THIS THE PERFECT HOT FUDGE SAUCE?
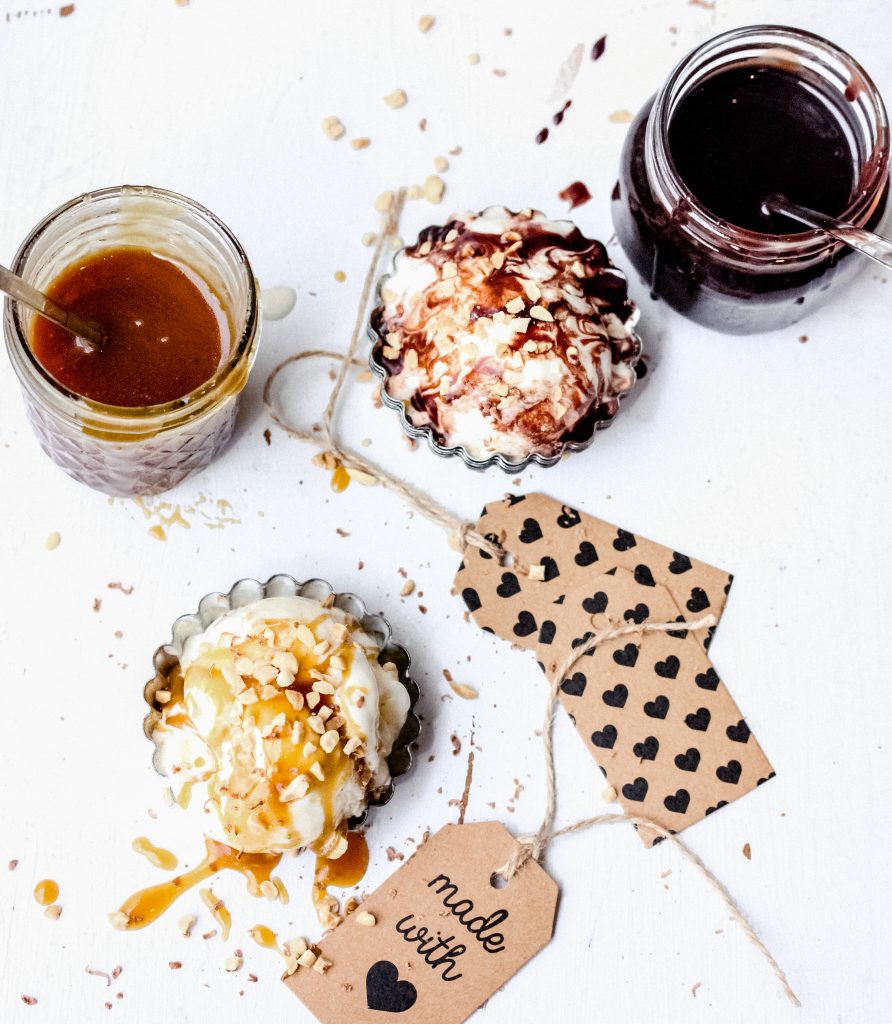
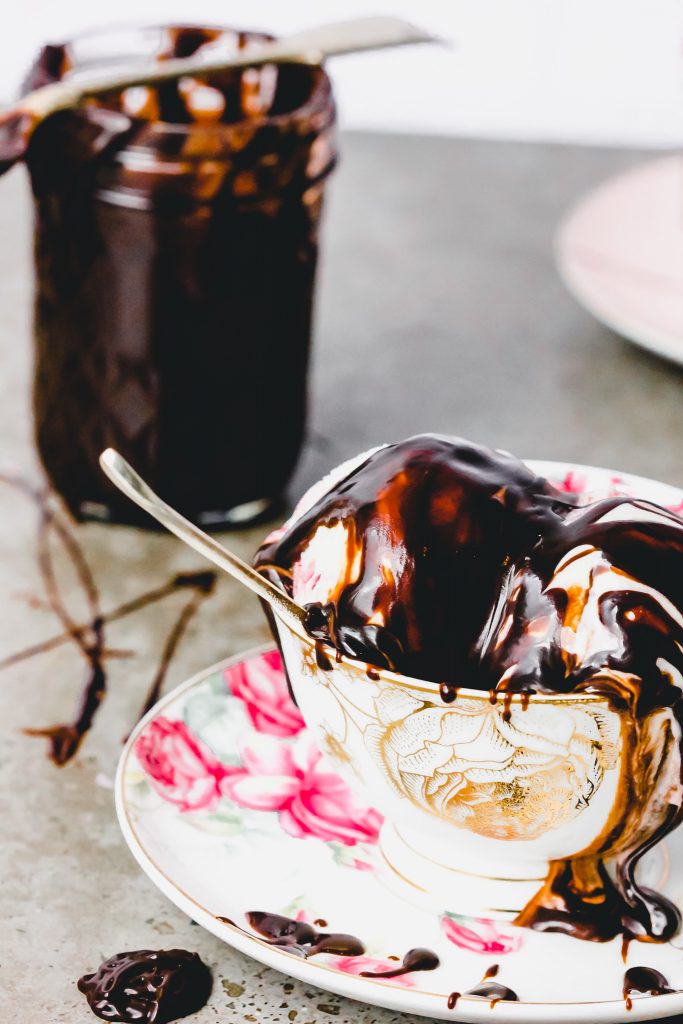
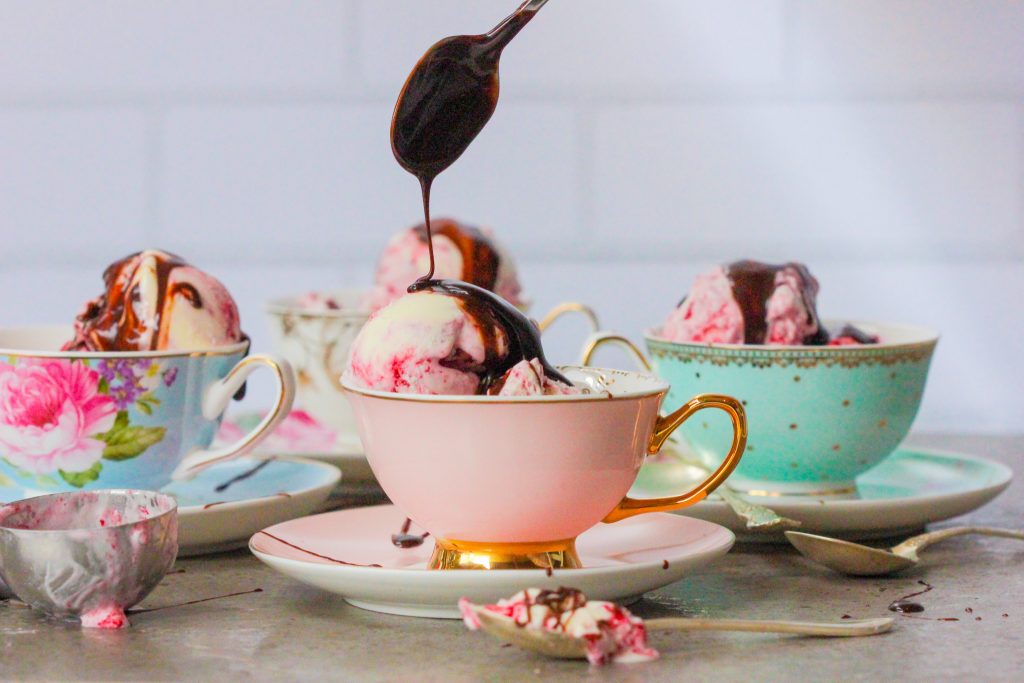
1. TEACUP ICE CREAM SUNDAES
For something a little fancy, scoop your favorite ice cream into pretty little teacups and pour over the hot fudge sauce for an easy yet eye-catching pretty dessert for your guests.
2. GANACHE
Let the chocolate cool completely before putting in the fridge to set. Once set you can spread over chocolate cakes or fill cupcake craters or pipe onto cupcakes. You may need to let it come back to room temperature before piping and spreading can occur.
3. SAUCE
Ideal to pour over my fav, boysenberry ice cream or vanilla is another perfect combination. Or it can be refrigerated and then microwaved to re-use later.
4. TRUFFLES
Make the perfect chocolate truffles for an after-dinner treat! Let the chocolate sauce cool completely then allowing to set in the fridge, preferably overnight. Then remove and roll into truffles balls rolling them in Dutch cocoa and leaving in the fridge until your guests arrive.
5. GIFT GIVING
Pour into a jar and allow to completely cook. Then wrap with pretty ribbon around the jar and give as a gift with a little note attached saying “Ideal accompaniment to ice cream, desserts and cakes”.
Can we all agree that this is the best hot fudge sauce in town. Easy, quick and reliable. But most of all chocolatey fudgy and completely decadent! Go for it my friends!
My book Laying Gods Table has many more decadent recipes for you to enjoy! Please click on link to get yourself a copy.
For ideas and tips on how to practice hospitality please read my blog post 5 tips for practicing Christian Hospitality. It will give you ways on how you too can demonstrate God’s love in action.
As always I would love to hear from you! If you’ve tried this recipe and like it please leave me a comment below.
Loves, Richelle xxx
The post Hot Fudge Sauce appeared first on Laying God's Table.
]]>The post Chocolate, Brandy and Sultana Brownies appeared first on Laying God's Table.
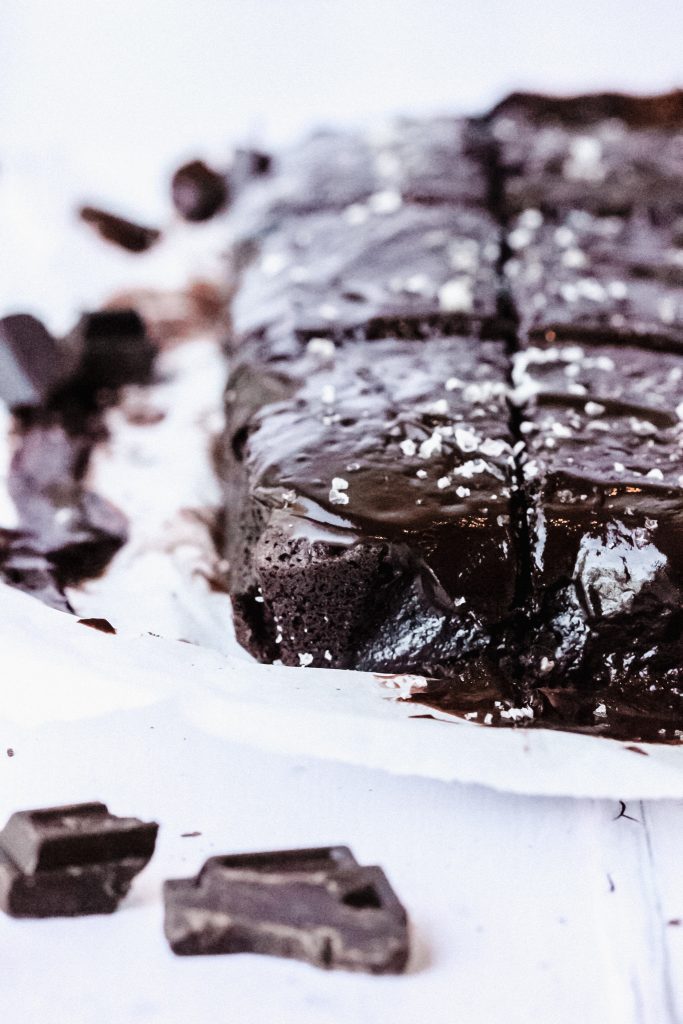
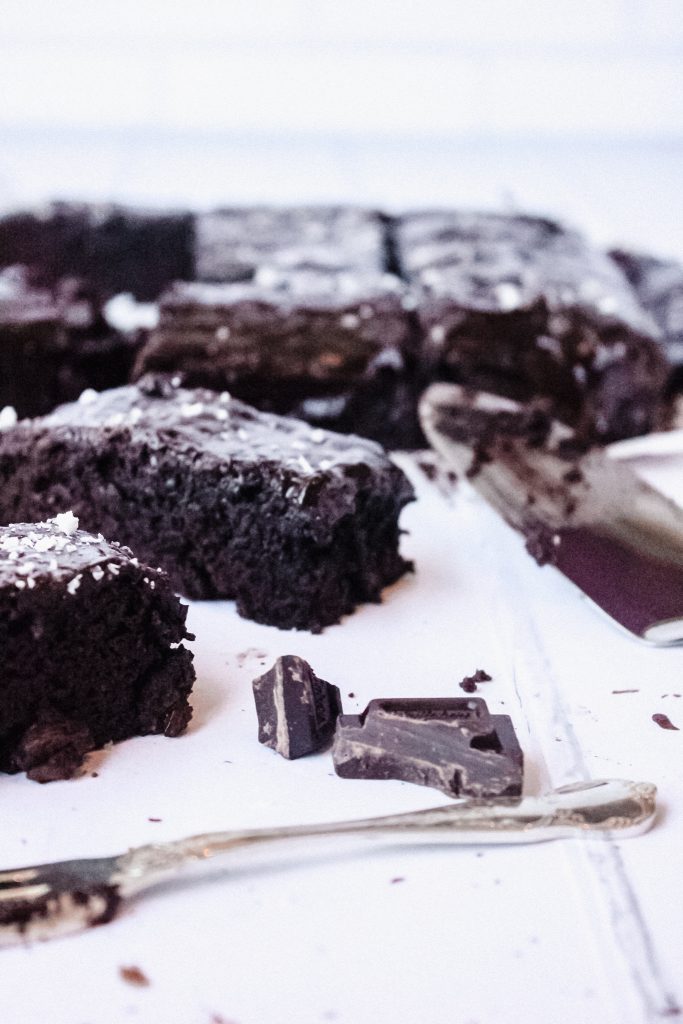
]]>Let me get you acquainted! What I can tell you about this batch of chocolate, brandy and sultana brownies is that they are incredibly fudgy, moist, dark, chocolatey and insanely DELICIOUS! The brandy and sultana add a flavor bomb that brings these brownies to next level! Then you pour over a chocolate ganache frosting and then you know you’re in utopia!!
I LOVE these brownies for so many reasons, and obviously because depth of chocolate that brandy lends itself to is just simply gorgeous!
I can assure you there’s nothing to worry about. The brandy does have a pronounced flavor, but it doesn’t overpower the brownies. One of the reasons is because there are copious amounts of chocolate to pair with it. Also, by only adding ½ cup brandy into the brownie mixture it will give the brownie a rich yet balanced flavor. Believe me you’re going to love them!
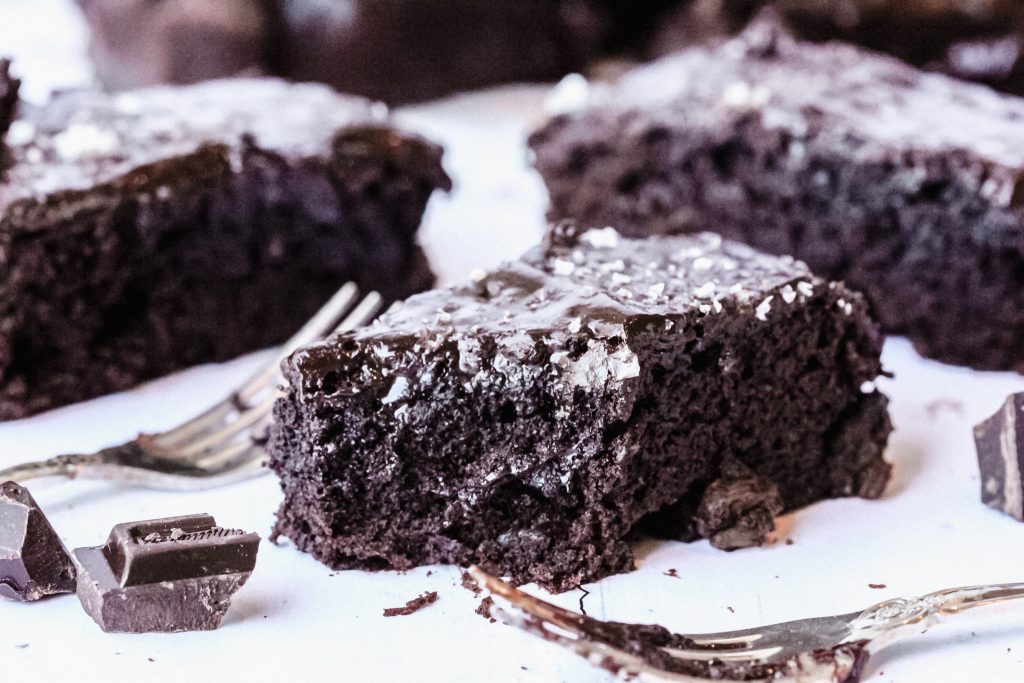
These fudgy brownies have a higher fat to flour ratio making them less inclined to be cakey. When testing my brownies, I added more chocolate and butter to the recipe, to achieve this result.
Now I want to tell you all about the reasons I love Chocolate, Brandy and Sultana Brownies!
This recipe is super easy, everything gets thrown into one big bowl……that’s it! Another reason is they are super versatile. Turn them into a dessert, or take them to a potluck dinner, you’ll be praised for bringing such a decadent dessert!
Now I would like to give you some baking tips, which will build you’re confidence to give them a go.
BAKING TIPS FOR THIS RECIPE
Over-mixing
Don’t over mix the brownie batter – overmixing aerates the brownies with air resulting in a cakey brownie. No one wants a cakey brownie. Once you see the ingredients are incorporated try to resist the urge to keep stirring, and as quick as you can get them into the baking tin.
Over-baking
This one is a bit tricky because how do you know when your brownies are ready to come out of the oven. The usual way of testing with a pick of some sort doesn’t reflect accuracy. So here’s a rule of thumb that I use. Remove your brownies from the oven 3-5 minutes before the suggested baking time, pop them up on the bench as they will cook a little longer in the baking tin. This will yield a beautiful result and the chocolate, brandy and sultana brownies will have a super fudgey texture rather than an over baked, dry brownie.
Cooling
Allow your brownies to come down to room temperate before cutting them. This will give your brownies time to settle and stabilize all those decadent ingredients together. However, I completely understand if you can’t wait!! Just know that they will be like pudding in texture and if you can wait, it will be worth it!
Storing
Store the brownies in an airtight container in the fridge. They will keep for 7-10 days, that’s if they aren’t eaten first! If you prefer them at room temperature remove them from the fridge 15 minutes before required.
Freezing
You can freeze the brownies but they must be without the ganache frosting. Store them in an airtight container in the freezer. When ready to eat bring them to room temperature and then cover them with the ganache frosting.
HOW TO MAKE THESE BROWNIES
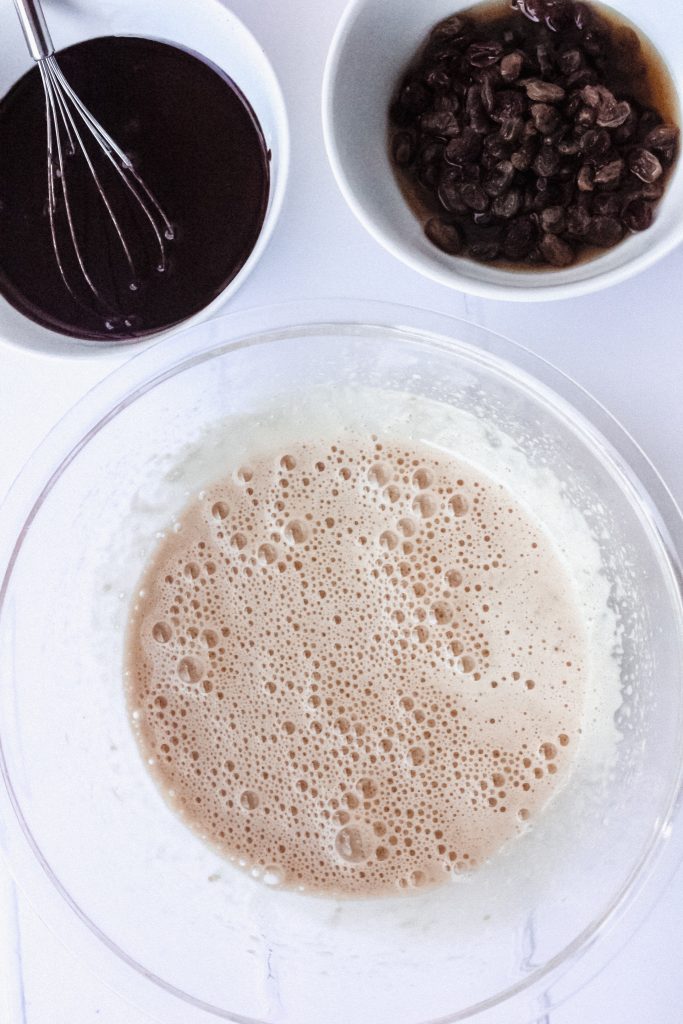
- You will need to soak the sultanas in the brandy overnight. The brandy will infuse itself into the sultanas and make them flavorsome and plumb. The brandy I used St Remy VSOP. I’ve used this brandy in my baking for years and have found it super reliable.
- Melt the chocolate and butter in the microwave at 30 second intervals. It took me 1 minute to melt the chocolate and butter together. I then used a small whisk to gently blend the mixture into a cohesive rich chocolate sauce. Then set this aside to cool slightly.
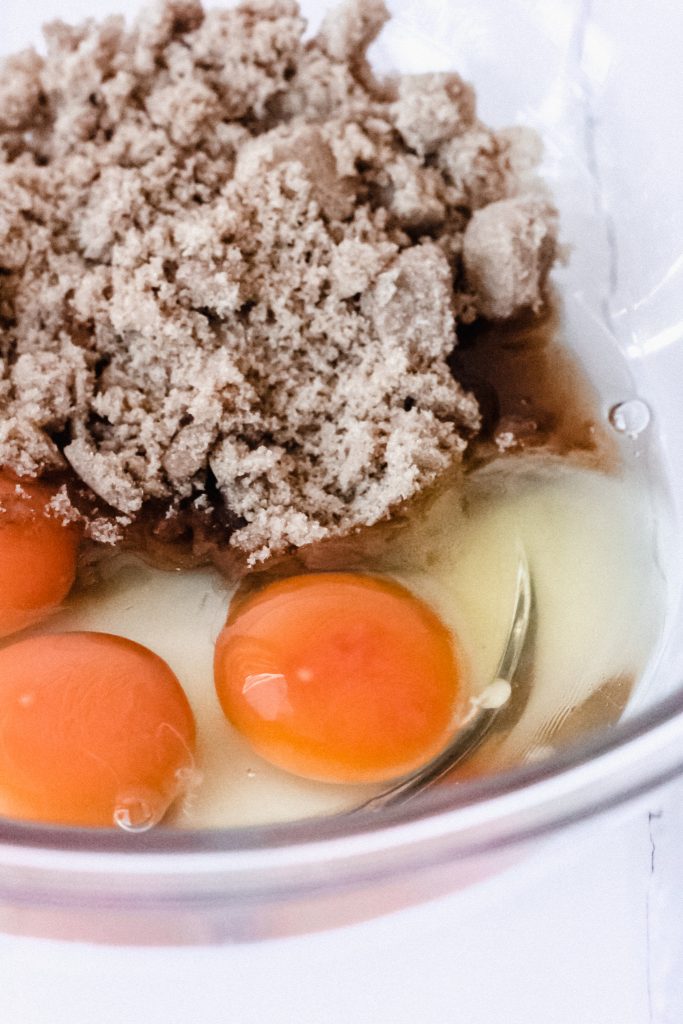
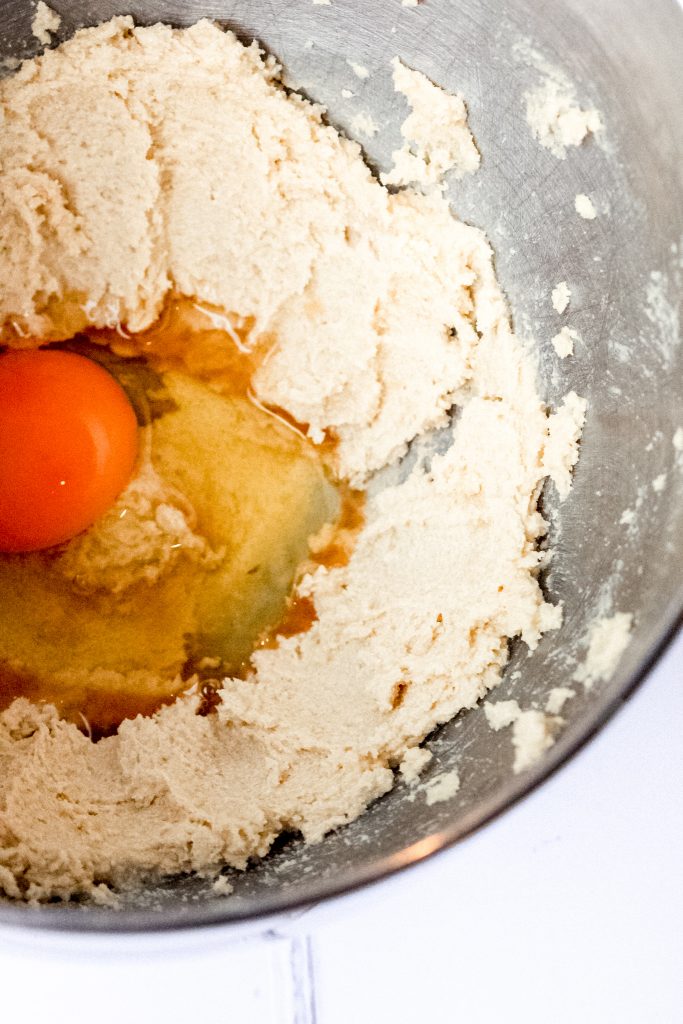
- Then you will need to beat the eggs, brown sugar and vanilla until light and frothy. I used a simple handheld beater to get the job done quick smart.
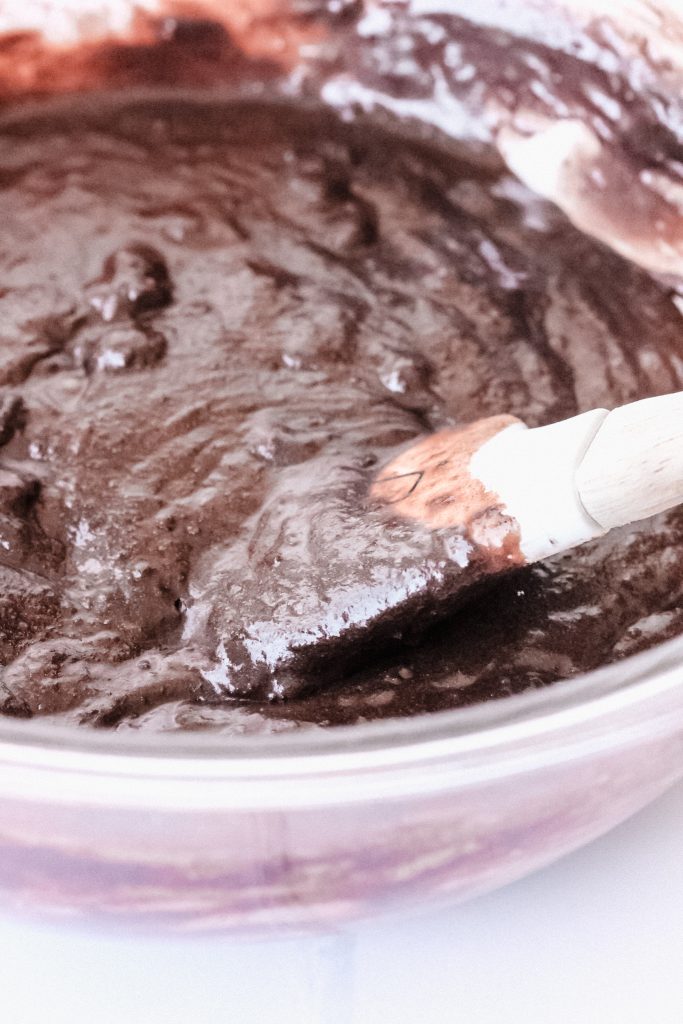
- Once the egg, sugar and vanilla mixture is light and frothy, pour in your chocolate and butter sauce and add the sifted flour and cocoa. Please gently fold through these ingredients through the brownie mixture until just incorporated remembering that over-mixing results in a not so good brownie.
- Then lastly add the brandy and sultanas and just gently fold through the brownie mixture until just incorporated.
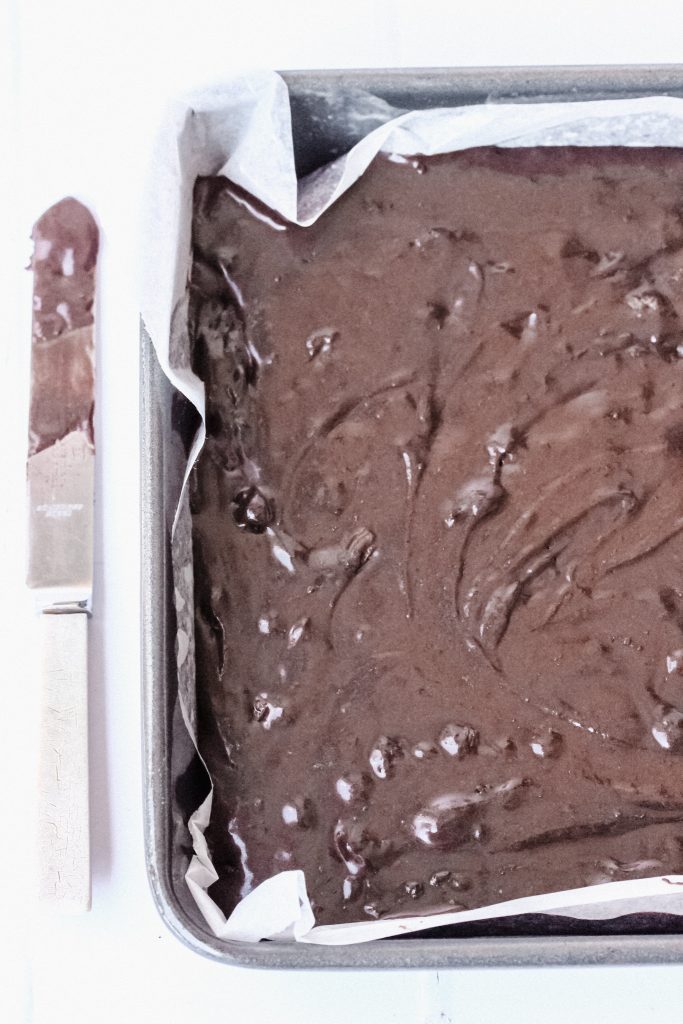
- Then pour into a greased and lined 20cm square cake tin and pop into the oven.
- It can be hard to tell if your brownies are ready to come out of the oven, so I look to take mine out approx. 5 minutes before the recommended bake time and left them in the tin. They will cook a little more in the hot tin bringing them to a perfectly dense and creamy brownie.
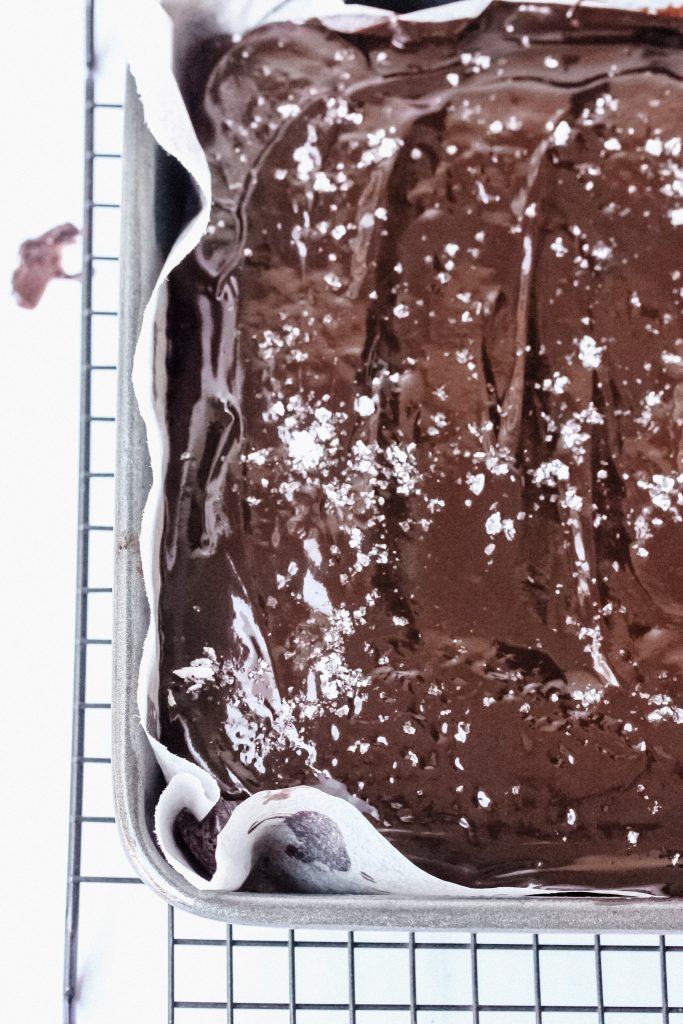
- To make the ganache I used Whittakers dark chocolate 62%. This will give your ganache a dark, rich and a full chocolate experience. Simply melt your chocolate and cream in the microwave in 30 second intervals until the chocolate has melted. Then add in the brandy if you are using and incorporate. Once the brownie has cooled spread the ganache over with a palette knife and pop in the fridge for setting.
WHAT TO DO WITH BROWNIES
To finish up today, I’d like to share a few ideas to encourage you to start baking and enjoying! You can do so many create things with your brownies, here are few fun things from me!
- Take them along to a picnic, beach BBQ or a potluck dinner to share with family and friends.
- Transform them into a rich decadent dessert by adding your favorite ice cream and a hot fudge sauce or pour over a warm vanilla custard.
- Gift them to a friend or family member (keep in mind the alcohol content might not be suitable for kids)
- Take them to work for your colleagues to share at morning tea….wow what a treat for them, you’ll certainly be the favoured one!
- Or keep them for yourself! Hahahahahahahaha! Cut up a few pieces to have with your freshly brewed coffee.
- Have them as a naughty treat whilst watching a movie or reading a good book.
That’s it my friends! Go and be merry and enjoy the simple things in life!
My book Laying Gods Table has many more delectable recipes for you to enjoy! Please click on link to get yourself a copy.
For ideas and tips on how to practice hospitality please read my blog post 5 tips for practicing Christian Hospitality. It will give you ways on how you too can demonstrate God’s love in action.
One more note from me, if you’ve baked this chocolate, brandy and sultana brownie, please leave me a comment below and if you can give me a recipe rating too! I would absolutely love to hear from you!
The post Chocolate, Brandy and Sultana Brownies appeared first on Laying God's Table.
]]>It’s a perfect recipe, no fuss, no chilling, and no fancy ingredients, just lots of chocolate…..hey, no complaints from me!
The post Double Chocolate Chunk Cookies appeared first on Laying God's Table.
]]>It’s a perfect recipe, no fuss, no chilling, and no fancy ingredients, just lots of chocolate…..hey, no complaints from me!
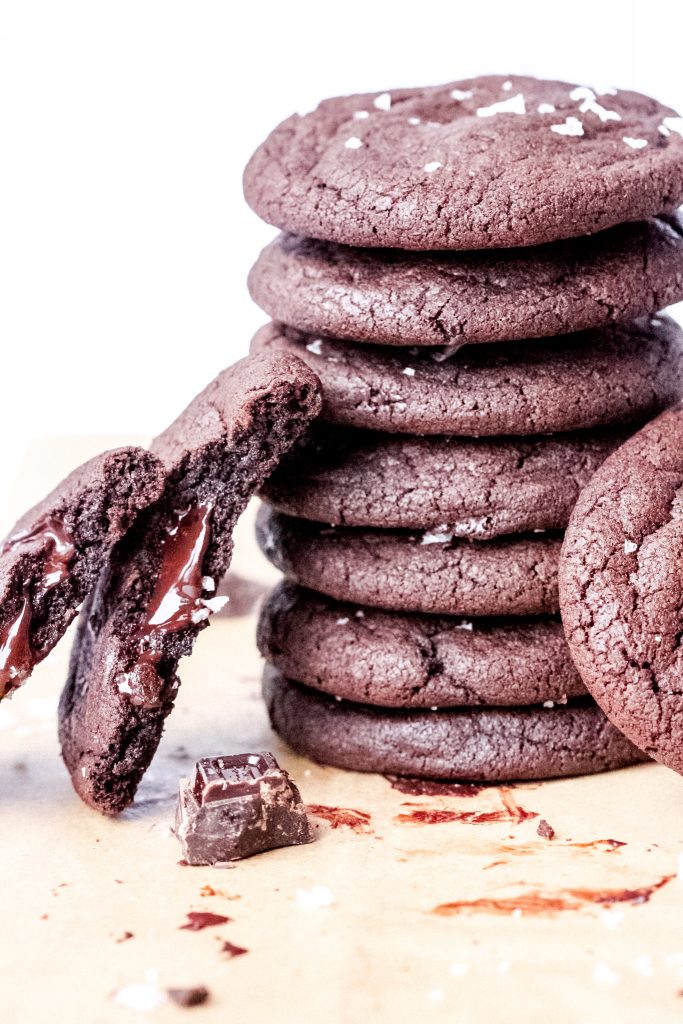
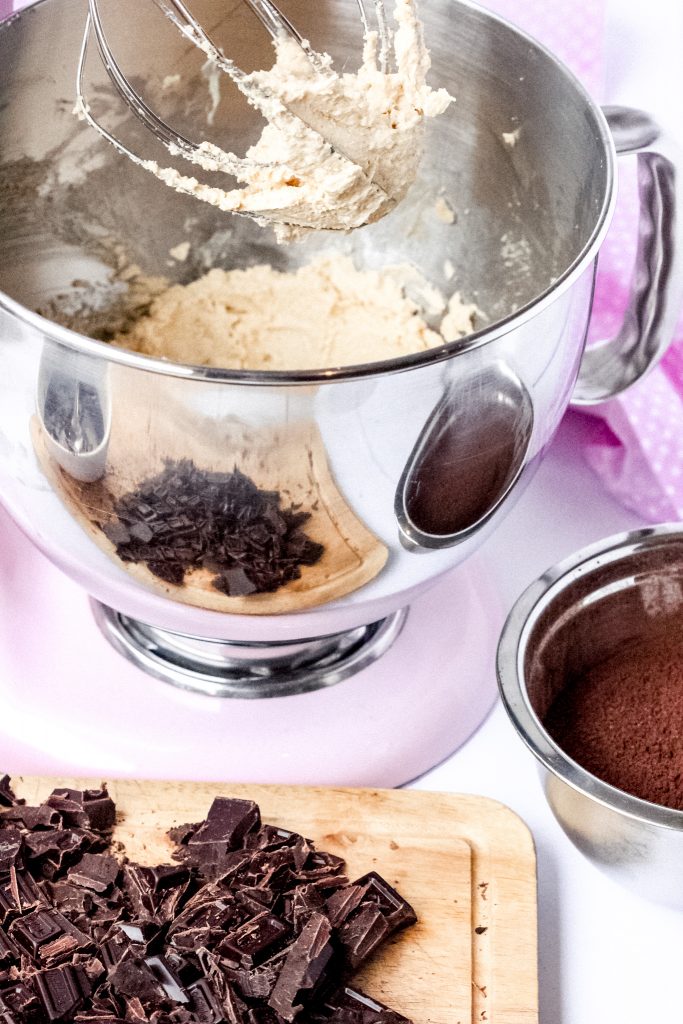
For the best double chocolate chunk cookies to succeed we use melted chocolate, cocoa powder and chunks of dark chocolate all mixed together to make an impeccable cookie.
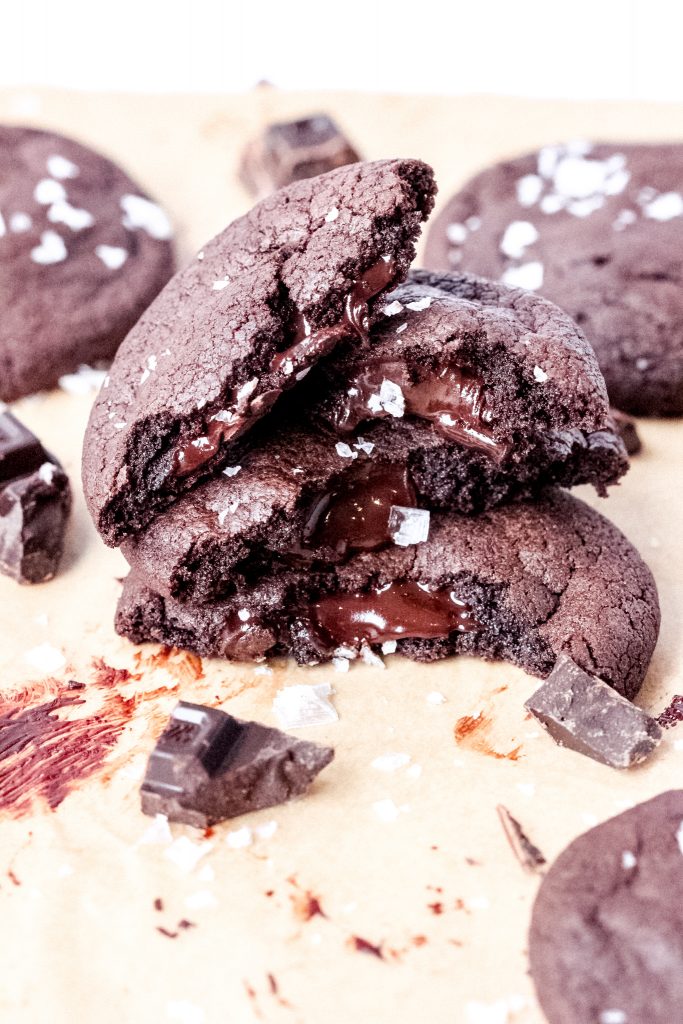
Another interesting addition to this delicious cookie is flaky salt. I believe that’s the new secret ingredient for the future. Anyway let’s move forward and get these baked so we can EAT!
WHAT IS A DOUBLE CHOCOLATE CHUNK COOKIE?
Basically it’s a cookie with double the chocolate. The first chocolate component is the dark chocolate and the second is the cocoa, and this is what makes it certified as a double chocolate chunk cookie.
I could at this point technically call these triple chocolate chunk cookies as in the ingredients there are 3 additions – melted chocolate, cocoa powder and dark chocolate chunks all added to the recipe. However let’s not split hairs, whether they are double or technically triple it really doesn’t matter as long as they are full of intense flavour and melt in your mouth…..and I can vouch, that’s what they are!!
HOW TO MAKE DOUBLE CHOCOLATE CHUNK COOKIES
- Start by preheating your oven to 160°C fan bake and line two baking trays with baking paper. Then set them aside.
- Place 50 grams of the dark chocolate in a microwave safe bowl and microwave for 30 second intervals until the chocolate has melted. Mine took 1 minute in total. Then set it aside.
- In your stand mixer (I used my Kitchen Aid for this recipe as it comes with a huge bowl as part of the package) or a handheld beater and a bowl and beat the butter and two sugars until light and fluffy, which takes around 3-5 minutes.
- Crack in an egg and the vanilla and beat again for a further2-3 minutes. What you’re looking for is a creamy consistency.

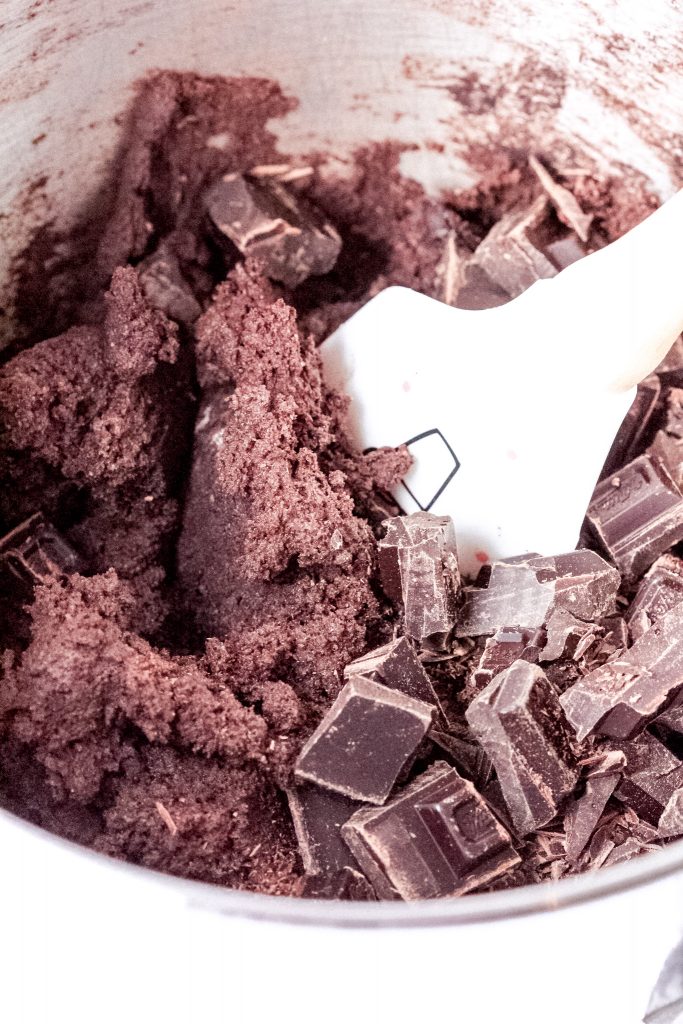
- Now remove your bowl from the mixer and add in your sifted flour and cocoa, along with the salt and melted chocolate. Gently mix using a wooden spoon to get all the ingredients incorporated into one chocolatey dough.
- Then add in the remaining 200 grams of roughly chopped chocolate and mix until all ingredients are incorporated. Tip: I used my washed hands to mix the chocolate into the dough.
- Slight dampen your hands (this will help the cookie dough from sticking to your hands). Then roll your cookie dough into balls. Weigh them as you go on a scale at 40 grams each in weight. I do this so that each cookie has a consistency in size, shape and weight.
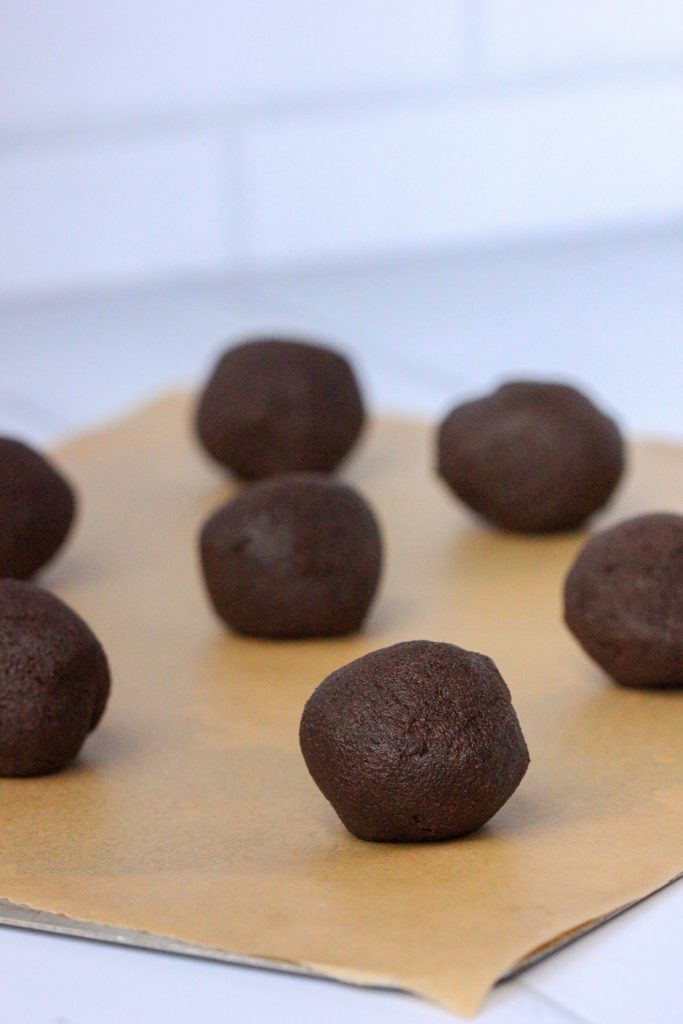
- Put your cookie dough balls onto your prepared trays. Tip: No need to flatten your cookie balls as during the baking process they will spread into a perfect shape without flattening.
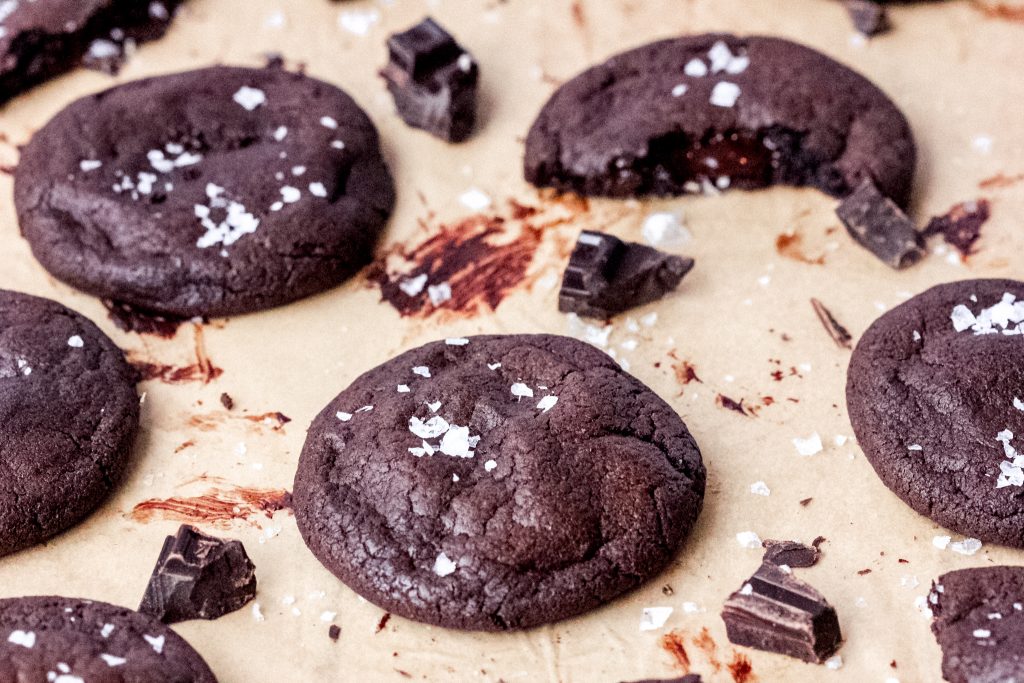
- Bake for 10-12 minutes until you see very slight cracks appear. Remove from the oven immediately to cool.
BAKING TIPS FOR THIS RECIPE
The chocolate
For this recipe I used Whittaker’s 50% dark chocolate and roughly chopped the chocolate up into some fine chunks and some chunkier chunks for texture. I do this because when you open up the cookie the dark chocolate is gooey and melty……just delicious!
Scooping
I use a medium sized ice cream scoop. However, to get my cookies being consistent in shape, I weigh my cookie dough at 40 grams per cookie. It sounds like a lot of work but once you get into a roll (excuse my punt) you won’t regret it, your cookies will be almost perfect!
Baking
I prefer to underbake my cookies and then leave for 15-20 minutes on the tray so that you get a gooey, chewy cookie as opposed to a hard overcooked cookie.
Flaky Salt
Flaky salt enhances the flavour of the cookie. It will give your cookie an edge. I use Maldon Flaky Salt.
Cooling
These cookies need to cool for approx. 15-20 minutes on the tray before removing them to either pop into the fridge for chilling (for ice cream sandwiches) or for eating. Because these cookies are chocolate heavy they will simply fall apart. So letting them cool on the tray will ensure they hold their shape and set a little.
Don’t worry you won’t miss out on all the gooey-ness this procedure is just to make sure your cookies don’t fall apart.
A GO-TO GUIDE TO GIFTING COOKIES
I LOVE giving my baking away especially cookies. There is something special that giving baking away does to transform your heart. The bible says, “It is more blessed to give than to receive”, – Acts 20:35.
Here is my go-to guide on how to gift cookies. Hopefully this guide will help you and encourage you as well as offering some practical ideas on practicing hospitality.
- Gift them to a friend, neighbor, family or your work colleagues (trust me you’ll soon become everyone’s favorite work mate!).
- Sell them as a fundraiser for a cause that you believe in and love.
- Take them to a picnic or BBQ.
- Serve them as an afternoon tea with friends or family.
- “Fill A Cake Tin” instructions:
- Once the cookies are cooled, fill a cake tin (I purchased mine at a 2nd shop) or a biscuit/cake tin from your favorite store.
- Line the cake tin with baking paper.
- Then simply fill the tin with the cookies.
- Attach a little note saying what type of cookie is in the cake tin and then gift away!!
OTHER CREATIVE WAYS WITH COOKIES
- Because these cookies are soft, chewy and have a slight crispy edge they are perfect for turning them into Mint Chocolate Chip Ice Cream Sandwiches.
- Crumble the cookies over scoops of your favorite ice-cream and pour over a hot fudge sauce.
- Create an after-dinner treat. Simply add ¼ teaspoon of peppermint essence into the cookie dough and serve with a hot chocolate, a hot brewed coffee or a cup of tea.
- Create a “Cookie and Milk” Bar.

Final words of advice from me, make sure you have a glass of milk ready to pair with these yummy cookies!
That’s all friends! Enjoy xxx
My book Laying Gods Table has many more delectable cookie recipes for you to enjoy! Please click on link to get yourself a copy.
For ideas and tips on how to practice hospitality please read my blog post 5 tips for practicing Christian Hospitality. It will give you ways on how you too can demonstrate God’s love in action.
If you’ve tried this recipe and like it please leave me a comment below. I would love to hear from you!
The post Double Chocolate Chunk Cookies appeared first on Laying God's Table.
]]>The post Mint Chocolate Chip Ice Cream Sandwiches appeared first on Laying God's Table.
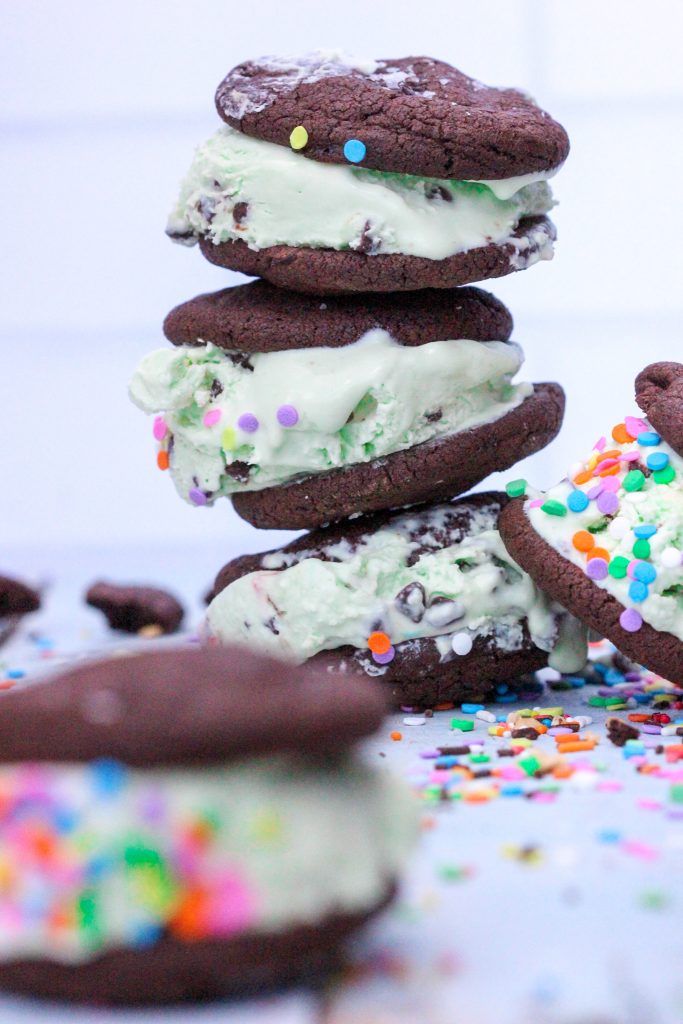
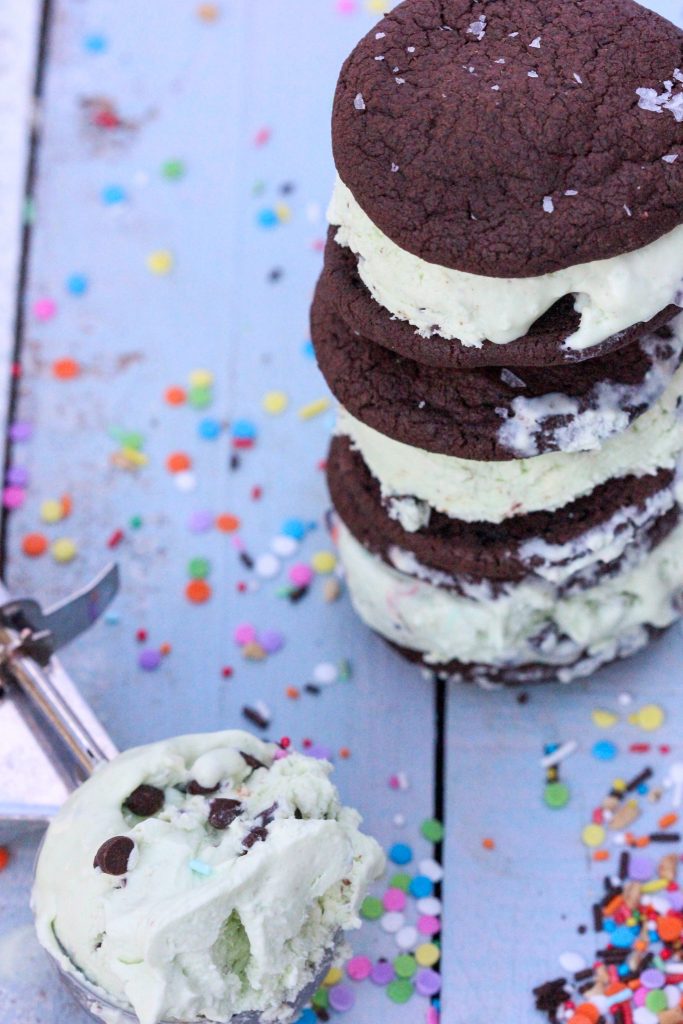
]]>I am utterly fixated on these mint chocolate chip ice cream sandwiches…. yes obsessed! Why you ask? Well, let me tell you!
Think about a perfectly dark, rich, chewy, fudgy double chocolate chunk cookie paired with a dreamy creamy mint chocolate chip ice cream…hello!!
I don’t even remember the first time I actually laid eyes on an ice cream sandwich. I think it was when Pinterest came to New Zealand and since then I can’t keep my eyes off them!
The double chocolate chunk cookies in this recipe are unquestionably the perfectly chewy, fudgy cookie to match up with the colossal amounts of mint chocolate chip ice cream!
Which in turn will make you very happy when you sandwich them together for a perfect symphony of chocolate and mint delight!

So, what does make a perfect ice cream sandwich? Let’s look into it.
DISCOVER WHAT MAKES A PERFECT ICE CREAM SANDWICH
The blueprint for making the perfect ice cream sandwich is quite simple.
The first requirement is to have a cookie that remains soft when frozen as you don’t want your guests cracking a tooth when they bite into a hard cookie!
Next is in the assembly of the ice cream sandwich. Once you have made the ice cream sandwiches, allow them to freeze for a while (at least 1 hour) in a square tin, lined with baking paper. This will give the ice cream sandwiches a chance to become cohesive to each other before you hand them out to your guests for eating.
The good news is, with a little planning ahead this will become very easy to achieve.
TIPS FOR MAKING ICE CREAM SANDWICHES
Before you start assembling the sandwiches, below are some tips that will ensure you get the perfect ice cream sandwich:
- For best results bake the cookies the day prior to making and serving your ice cream sandwiches. This will give the cookies plenty of time to set.
- On the day of making your ice cream sandwiches, make sure you chill the baked cookies in the fridge for 1 hour before assembling the sandwiches. This will help the cookie stick to the ice cream and not melt as quickly.
- To get the best possible ice cream sandwich it is preferable to assemble the ice cream sandwiches and place them in a square baking tin lined with baking paper into the freezer for at least 30 minutes, so that become cemented together before you hand them over to your guests for EATING!
However, if are desperately wanting to eat your ice cream sandwiches before chilling (and I completely understand!) be prepared for a BIG sloppy mess, because if they are still warm then the ice cream will melt.
HOW TO MAKE CHOCOLATE MINT ICE CREAM SANDWICHES
Firstly, you will need to start making the Double Chocolate Chunk Cookies. Then you can start on the mint chocolate chip ice cream once your cookies are chilling.
HOW TO MAKE DOUBLE CHOCOLATE CHUNK COOKIES
Here’s my tip for getting all your components ready. Make the Cookies and the Ice Cream the day before you intend on serving your Mint Chocolate Chip Ice Cream Sandwiches. Below are the instructions……yippee!!
- Make the cookies following my recipe here
- Once the cookies are baked and cooled leave them in the fridge overnight until you are ready to assemble with the mint chocolate chip ice cream.
HOW TO MAKE NO CHURN MINT CHOCOLATE CHIP ICE CREAM
- Start by chilling the bowl you intend on using to make the ice cream. I chill mine in the fridge for about 30 minutes.
- Prepare the vessel that the ice cream is going to go into to which in turn will be placed in the freezer. I used a loaf tin with a beeswax cover, or you could use a 2 litre plastic container or a 2 litre serving dish or bowl as long as it has a lid or cover. This will help the ice cream set and from becoming icy.
- In your chilled bowl pour in the whipping cream and begin whipping. Start this process slowly so the cream doesn’t splash up everywhere. Once the cream has thickened crank up the speed on high until soft peaks form.
- Once soft peaks have formed turn the mixer speed to low and slowly pour in the condensed milk until just combined.

- Now comes the fun! At this point I add in the peppermint essence and food color (I used Wilton’s gel in color Kelly Green) and gently mix the peppermint and food color through the ice cream base.
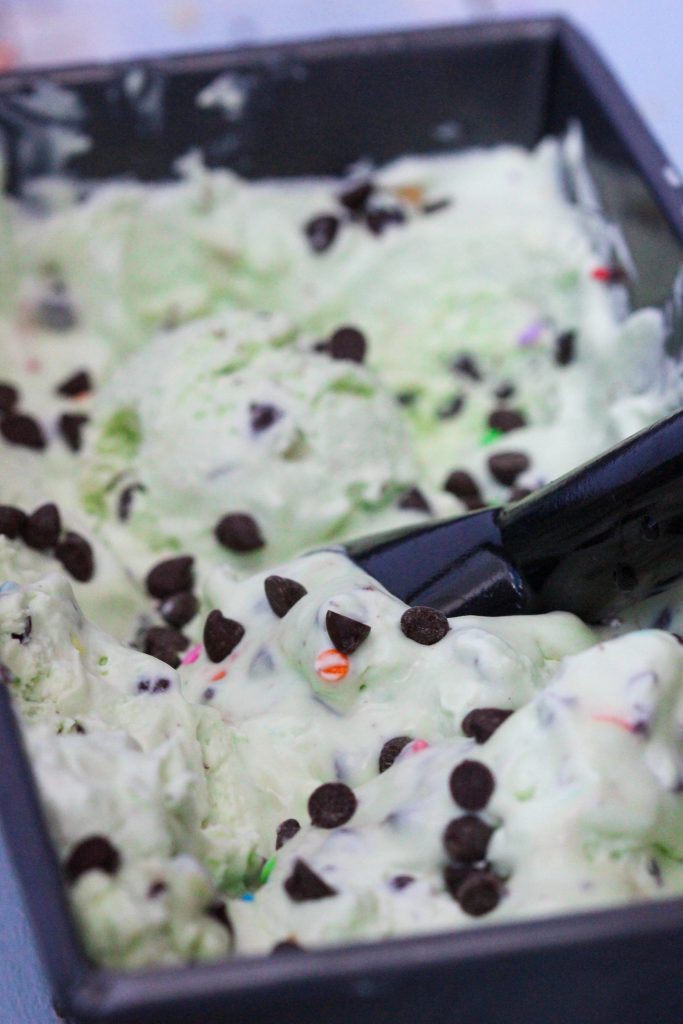
- Once it’s all combined, stir in the chocolate chips. Here’s a tip: I chopped my chocolate chips up a bit so that little and big bits would be incorporated through the batch of ice cream……yummy! And also saved a small handful to scatter over the ice cream once you’ve poured it into your tin.
- Now the ice cream is created, pour it into your chilled loaf tin, sprinkle over a handful of your saved chocolate chips, cover and freeze for at least 8 hours, or preferably overnight.
HOW TO ASSEMBLE YOUR ICE CREAM SANDWICHES
Here’s the exciting part, assembling for eating….yay! Let me walk you through the steps.
- Start by making sure the double chocolate chunk cookies have chilled in the fridge for at least 30 minutes.
- When the cookies have been chilling and you’re ready to assemble, remove the ice cream from the freezer and let it soften for about 3-5 minutes.
- Scoop out the required amount of your favorite ice cream per cookie and sandwich together. Then pop them into the freezer in a baking tin lined with baking paper for 30 minutes.
- Then after 30 minutes go right ahead and SERVE, EAT and ENJOY!

Whoo-hoo you’re ready to go! Start baking up some double chocolate chunk cookies, make your creamy mint chocolate chip ice cream, scoop it altogether with two fudgy cookies, freeze them and then you guessed it……EAT THEM!!!
My book Laying Gods Table has many more delectable ice cream & cookie recipes for you to enjoy! Please click on link to get yourself a copy.
For ideas and tips on how to practice hospitality please read my blog post 5 tips for practicing Christian Hospitality. It will give you ways on how you too can demonstrate God’s love in action.
When you share with friends or family these exquisite mint chocolate chip ice cream sandwiches you are showing God’s love in action!
If you’ve tried this recipe and like it please leave me a comment below. I would love to hear from you! xx
The post Mint Chocolate Chip Ice Cream Sandwiches appeared first on Laying God's Table.
]]>